

搜索到
14
篇与
ubuntu
的结果
-
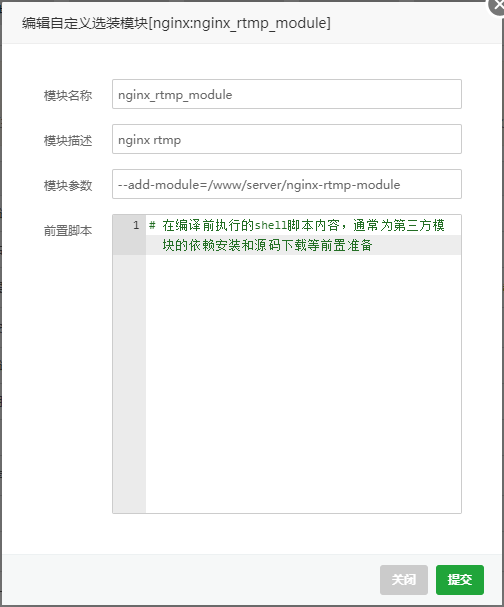
 ubuntu宝塔面板安装nginx-rtmp-module 1.从git上下载nginx-rtmp模块git clone https://github.com/arut/nginx-rtmp-module.git{alert type="error"}注意: 千万不要 先在windows平台下载rtmp模块文件,然后打包迁移到linux系统。否则文件编码格式将会被改变,怎么安装都不会成功。会出现错误提示:unknown directive "rtmp" {/alert}若没有安装git和gcc编译环境apt install -y gcc gcc-c++ autoconf wget apt -y install wget gcc-c++ ncurses ncurses-devel cmake make perl bison openssl openssl-devel gcc* libxml2 libxml2-devel curl-devel libjpeg* libpng* freetype*apt install -y git2.编译安装nginx时添加nginx-rtmp模块从宝塔中安装nginx中安装,选择编译安装,会出现自定义模块界面,点击添加,在弹出的界面输入:{alert type="error"}模块名称: nginx_rtmp_module 描述: nginx rtmp 参数: –add-module=/www/server/nginx-rtmp-module {/alert}验证:看到 --add-module=/allroot/programs/nginx-rtmp-module 另一种安装方式:修改 /www/server/panel/install/nginx.sh 安装命令,需要先用宝塔执行过编译安装命令后才会有该文件/www/server/panel/install然后执行安装命令sh /www/server/panel/install/nginx.sh install 1.203.修改nginx.conf配置rtmp_auto_push on; rtmp { server { listen 1935; #监听端口,记得开放 ping 30s; chunk_size 4000; notify_method get; application hls {#rtmp推流请求路径 live on; hls on; hls_path /www/server/nginx/hls; #视频流暂存地址 hls_sync 100ms; hls_fragment 5s; #切片大小,越小占用资源越高,但是延时越小,默认5s } application live { live on; } # Video on demand #application vod { # play /www/server/nginx/Videos; #} # Video on demand over HTTP #application vod_http { # play http://localhost:8080/vod/; #} } }#rtmp状态 location /stat { rtmp_stat all; rtmp_stat_stylesheet stat.xsl; } location /stat.xsl { #rtmp-module模块安装地址,这个可以通过http看到状态 root /allroot/programs/nginx-rtmp-module; } #http支持hls流播放 location /hls { #Serve HLS config types { application/vnd.apple.mpegurl m3u8; video/mp2t ts; } root /allroot/programs/live/hls; #与视频流暂存地址相同 expires -1; add_header Cache-Control no-cache; } 4.测hi推流ffmpeg -re -i test.flv -vcodec copy -acodec copy -f flv rtmp://10.163.102.157:1936/hls/test点播模型rtmp { server { listen 1935; #//服务端口 chunk_size 4096; #//数据传输块的大小 application video { play /usr/local/data/video; #//视频文件存放位置,访问方式rtmp://localhost:1935/video } } }5.直播回放rtmp { server { listen 1935; chunk_size 4096; application video { play /usr/local/data/video; } application live { live on;#直播模式 hls on; #这个参数把直播服务器改造成实时回放服务器。 wait_key on; #对视频切片进行保护,这样就不会产生马赛克了。 hls_path /usr/local/data/hls; #切片视频文件存放位置。 hls_fragment 10s; #每个视频切片的时长。 hls_playlist_length 60s; #总共可以回看的事件,这里设置的是1分钟。 hls_continuous on; #连续模式。 hls_cleanup on; #对多余的切片进行删除。 hls_nested on; #嵌套模式。 } }
 -
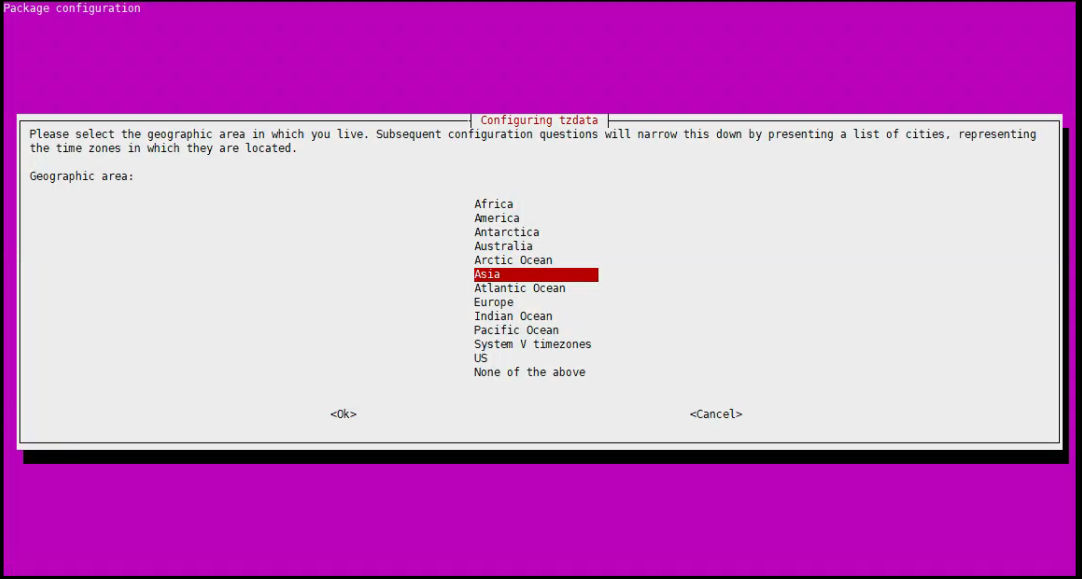
ubuntu修改时区 查看时区命令timedatectl显示:root@server:/allroot/sg-server# timedatectl Local time: Wed 2021-11-24 22:56:11 CST Universal time: Wed 2021-11-24 14:56:11 UTC RTC time: Wed 2021-11-24 14:56:11 Time zone: Asia/Shanghai (CST, +0800) System clock synchronized: yes NTP service: active RTC in local TZ: no root@server:/allroot/sg-server# 修改时区命令dpkg-reconfigure tzdata地区选Asia时区选Shanghai
-
ubuntu20.04 server 安装后磁盘空间只有一半的处理 root@xserver:~# vgdisplay --- Volume group --- VG Name ubuntu-vg System ID Format lvm2 Metadata Areas 1 Metadata Sequence No 2 VG Access read/write VG Status resizable MAX LV 0 Cur LV 1 Open LV 1 Max PV 0 Cur PV 1 Act PV 1 VG Size <930.01 GiB PE Size 4.00 MiB Total PE 238082 Alloc PE / Size 51200 / 200.00 GiB Free PE / Size 186882 / <730.01 GiB VG UUID y2MIFl-1LSQ-LdlQ-OE3W-U7E3-f0zB-Hrlq45可以看到还有Free PE/Size 186882/<730.01 GiB,下面就要把这部分空间利用起来看磁盘目录root@tboyserver:~# df -h Filesystem Size Used Avail Use% Mounted on udev 32G 0 32G 0% /dev tmpfs 6.3G 1.6M 6.3G 1% /run /dev/mapper/ubuntu--vg-ubuntu--lv 196G 12G 175G 6% / tmpfs 32G 4.0K 32G 1% /dev/shm tmpfs 5.0M 0 5.0M 0% /run/lock tmpfs 32G 0 32G 0% /sys/fs/cgroup /dev/nvme0n1p2 976M 107M 802M 12% /boot /dev/nvme0n1p1 511M 5.3M 506M 2% /boot/efi /dev/loop0 56M 56M 0 100% /snap/core18/2246 /dev/loop1 56M 56M 0 100% /snap/core18/2253 /dev/loop3 33M 33M 0 100% /snap/snapd/12704 /dev/loop4 68M 68M 0 100% /snap/lxd/21835 /dev/loop2 71M 71M 0 100% /snap/lxd/21029 /dev/loop5 33M 33M 0 100% /snap/snapd/13640 /dev/loop6 62M 62M 0 100% /snap/core20/1242 tmpfs 6.3G 0 6.3G 0% /run/user/1000扩展磁盘空间root@xserver:~# lvextend -l +100%FREE /dev/mapper/ubuntu--vg-ubuntu--lv Size of logical volume ubuntu-vg/ubuntu-lv changed from 200.00 GiB (51200 extents) to <930.01 GiB (238082 extents). Logical volume ubuntu-vg/ubuntu-lv successfully resized.重新计算磁盘大小root@xserver:~# resize2fs /dev/mapper/ubuntu--vg-ubuntu--lv resize2fs 1.45.5 (07-Jan-2020) Filesystem at /dev/mapper/ubuntu--vg-ubuntu--lv is mounted on /; on-line resizing required old_desc_blocks = 25, new_desc_blocks = 117 The filesystem on /dev/mapper/ubuntu--vg-ubuntu--lv is now 243795968 (4k) blocks long.再次查看磁盘情况:root@xserver:~# df -h Filesystem Size Used Avail Use% Mounted on udev 32G 0 32G 0% /dev tmpfs 6.3G 1.6M 6.3G 1% /run /dev/mapper/ubuntu--vg-ubuntu--lv 915G 12G 865G 2% / tmpfs 32G 4.0K 32G 1% /dev/shm tmpfs 5.0M 0 5.0M 0% /run/lock tmpfs 32G 0 32G 0% /sys/fs/cgroup /dev/nvme0n1p2 976M 107M 802M 12% /boot /dev/nvme0n1p1 511M 5.3M 506M 2% /boot/efi /dev/loop0 56M 56M 0 100% /snap/core18/2246 /dev/loop1 56M 56M 0 100% /snap/core18/2253 /dev/loop3 33M 33M 0 100% /snap/snapd/12704 /dev/loop4 68M 68M 0 100% /snap/lxd/21835 /dev/loop2 71M 71M 0 100% /snap/lxd/21029 /dev/loop5 33M 33M 0 100% /snap/snapd/13640 /dev/loop6 62M 62M 0 100% /snap/core20/1242 tmpfs 6.3G 0 6.3G 0% /run/user/1000 root@xserver:~# vgdisplay --- Volume group --- VG Name ubuntu-vg System ID Format lvm2 Metadata Areas 1 Metadata Sequence No 3 VG Access read/write VG Status resizable MAX LV 0 Cur LV 1 Open LV 1 Max PV 0 Cur PV 1 Act PV 1 VG Size <930.01 GiB PE Size 4.00 MiB Total PE 238082 Alloc PE / Size 238082 / <930.01 GiB Free PE / Size 0 / 0 VG UUID y2MIFl-1LSQ-LdlQ-OE3W-U7E3-f0zB-Hrlq45
-
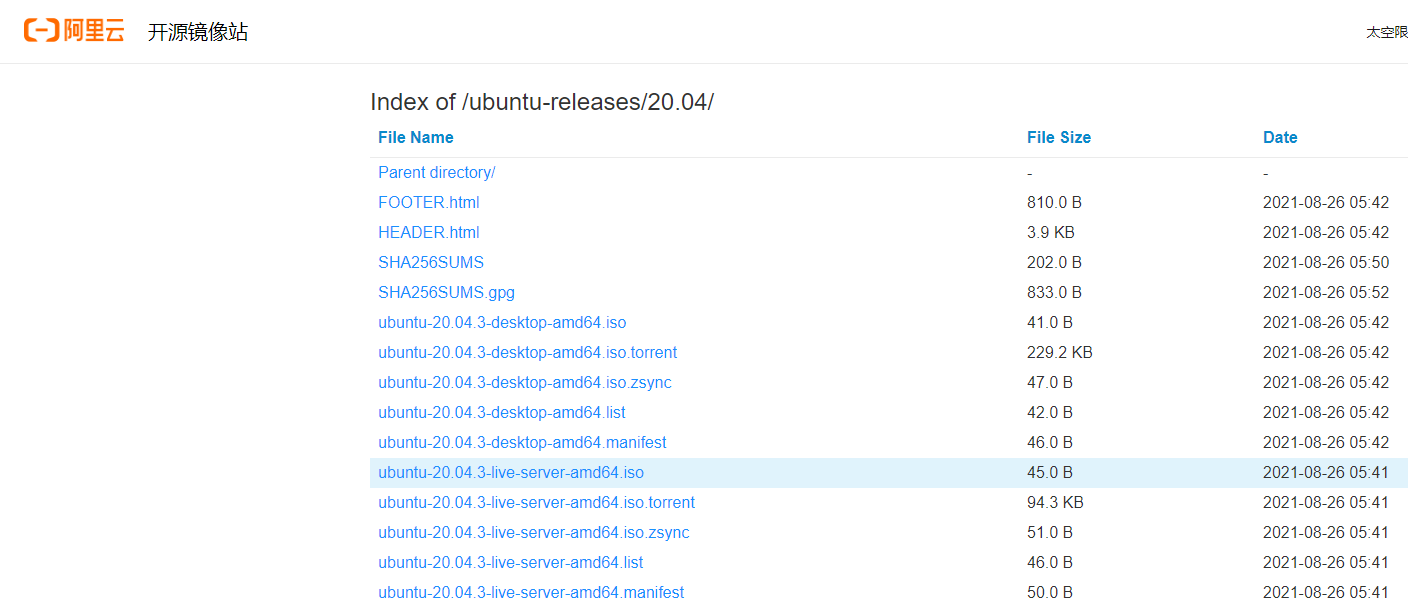
U盘安装Ubuntu Server 前言:1、Ubuntu是一个以桌面应用为主的Linux操作系统,其名称来自非洲南部祖鲁语或豪萨语的“ubuntu”一词,意思是“人性”“我的存在是因为大家的存在”,是非洲传统的一种价值观。2、Ubuntu基于Debian发行版和Gnome桌面环境,而从11.04版起,Ubuntu发行版放弃了Gnome桌面环境,改为Unity。从前人们认为Linux难以安装、难以使用,在Ubuntu出现后这些都成为了历史。3、Ubuntu也拥有庞大的社区力量,用户可以方便地从社区获得帮助。4、自Ubuntu 18.04 LTS起,Ubuntu发行版又重新开始使用GNOME3桌面环境。5、本教程安装适合服务器使用的 Ubuntu Server 20.04镜像下载和使用1、官方下载页面https://ubuntu.com/download/desktop2、阿里镜像站下载下载ubuntu-20.04.1-live-server-amd64.isohttp://mirrors.aliyun.com/ubuntu-releases/20.04/3、直接下载地址 http://mirrors.aliyun.com/ubuntu-releases/20.04/ubuntu-20.04.1-live-server-amd64.iso4、镜像使用 镜像使用下载后直接加载到虚拟机中,或者制作成U盘启动盘安装到物理服务器中安装和配置1、选择安装语言保持默认选择英文即可2、不更新,继续下一步选择 continue without updating3、键盘的语言选择英文4、设置网卡设置静态IP,如下图;Subnet 设置子网段、Address 设置IP地址、Gateway 设置网关地址、Name servers 设置 DNS 地址、Search domain 设置为 Local 设置完成后选择 Save5、代理设置一般都没有代理,选择 Done6、设置镜像源使用阿里云的 Ubuntu 镜像地址 https://mirrors.aliyun.com/ubuntu/7、设置硬盘如果你是新手参照下图只选择第一项,Ubuntu LVM 设置后续说明怎么设置选择了第二项不选第二项选择 Continue8、设置用户和密码9、设置 SSH如果需要使用远程登录到这台 Ubuntu Server 就需要设置 SSH;如下图设置10、服务安装根据自己的需要选择安装相关的服务11、安装更新可能时间比较久具体根据自己网络状况,可以选择 Cancel update and reboot 取消更新并重启其他参考文章:http://blog.yixao.net/soft/20856.html https://blog.csdn.net/weixin_42135235/article/details/109300403 https://blog.csdn.net/littleskyfish/article/details/107334104

您的IP: