

搜索到
126
篇与
server
的结果
-
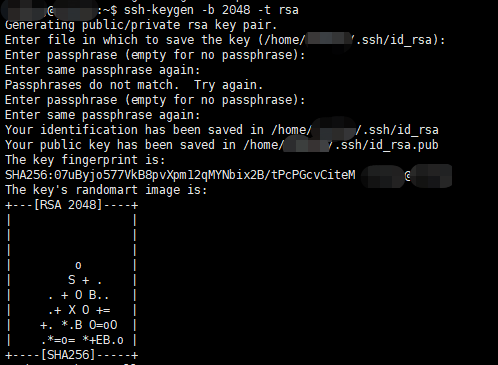
 ubuntu启用ssh密钥连接服务器 ssh-keygen 选项: -b:指定密钥长度; -e:读取openssh的私钥或者公钥文件; -C:添加注释; -f:指定用来保存密钥的文件名; -i:读取未加密的ssh-v2兼容的私钥/公钥文件,然后在标准输出设备上显示openssh兼容的私钥/公钥; -l:显示公钥文件的指纹数据; -N:提供一个新密语; -P:提供(旧)密语; -q:静默模式; -t:指定要创建的密钥类型。生成ssh-keygen -t rsa -N '' -f ~/.ssh/id_rsa 注册公钥cat ~/.ssh/id_rsa.pub >> ~/.ssh/authorized_keys或者直接改名authorized_keysmv id_rsa.pub authorized_keys赋权chmod 600 ~/.ssh/authorized_keys复制到远程主机ssh-copy-id -i ~/.ssh/id_rsa.pub sati2@192.168.8.174测试远程主机是否开启PubkeyAuthenticationgrep PubkeyAuthentication /etc/ssh/sshd_config设置目录权限chmod 700 .sshchmod 600 authorized_keys问题每次输入ssh命令后,虽然可以连接上目标服务器,但是往往要等待很久,这是因为ssh默认开启了地址反解析 将每个linux上/etc/ssh/sshd_config文件中修改或加入UseDNS=no,在server上/etc/ssh/sshd_config文件中修改GSSAPIAuthentication no 重启服务 PasswordAuthentication yes/on ----------------------> 开启或者关闭密码连接 PermitRootLogin yes/no ----------------------------->允许超级用户登录 AllowUsers student----------------------------->只允许登录的用户 DenyUsers student-------------------------->不允许登录的用户报错:WARNING: REMOTE HOST IDENTIFICATION HAS CHANGED!WARNING: REMOTE HOST IDENTIFICATION HAS CHANGED! IT IS POSSIBLE THAT SOMEONE IS DOING SOMETHING NASTY!Someone could be eavesdropping on you right now (man-in-the-middle attack)!It is also possible that the RSA host key has just been changed.The fingerprint for the RSA key sent by the remote host is36:68:a6:e6:43:34:6b:82:d7:f4:df:1f:c2:e7:37:cc.Please contact your system administrator.Add correct host key in /u/xlian008/.ssh/known_hosts to get rid of this message.Offending key in /u/xlian008/.ssh/known_hosts:2RSA host key for 135.1.35.130 has changed and you have requested strict checking.Host key verification failed.原因:ssh会把你每个你访问过计算机的公钥(public key)都记录在~/.ssh/known_hosts。当下次访问相同计算机时,OpenSSH会核对公钥。如果公钥不同,OpenSSH会发出警告,避免你受到DNS Hijack之类的*。处理1:删除~/.ssh/known_hosts 内相关IP的rsa信息处理2:使用命令清除所连接的IPssh-keygen -R XX.XX.XX.XX其中,XX.XX.XX.XX为之前连接时的网段IP重新连接
 -
ubuntu server 20.4.4安装后无网络问题 本文针对PCIE relatek 2.5G Ethernet LINUX driver r8125 for kernel up to 5.6一、用安卓手机共享网络(以OPPO智能机系统为例)1.用数据线连接手机2.打开 设置 -> 连接与共享 -> USB共享网络 二、在ubuntu主机上查找新网络接口通过命令查看当前网卡设备sudo lshw -C network此时可以看到两个设备 *-network DISABLED description: Ethernet interface product: RTL8125 2.5GbE Controller vendor: Realtek Semiconductor Co., Ltd. physical id: 0 bus info: pci@0000:01:00.0 logical name: enp1s0 version: 04 serial: d8:bb:c1:17:ba:67 size: 1Gbit/s capacity: 1Gbit/s width: 64 bits clock: 33MHz capabilities: pm msi pciexpress msix vpd bus_master cap_list ethernet physical tp 10bt 10bt-fd 100bt 100bt-fd 1000bt-fd autonegotiation configuration: autonegotiation=on broadcast=yes driver=r8125 driverversion=9.008.00-NAPI duplex=full ip=179.160.6.111 latency=0 link=yes multicast=yes port=twisted pair speed=1Gbit/s resources: irq:19 ioport:3000(size=256) memory:a2200000-a220ffff memory:a2210000-a2213fff *-network DISABLED description: Ethernet interface physical id: 2 bus info: usb@1:5 logical name: usb0 serial: 76:7e:24:83:87:cd capabilities: ethernet physical configuration: broadcast=yes driver=rndis_host driverversion=22-Aug-2005 firmware=RNDIS device link=no multicast=yes为网络接口分配IPdhclient usb0ip address可以看到已经有ip地址,并且ping www.baidu.com已经可以联网三、下载驱动安装包1.去 realtek官方驱动下载 下载得到驱动包 r8125-9.008.00.tar.bz2 搭建跟手机同一个网络的下载服务,以下为nginx搭建的本地网络下载服务配置client_max_body_size 8192m; proxy_max_temp_file_size 8192m; location /software { alias /allroot/download; autoindex on; # 显示目录 autoindex_exact_size on;# 显示文件大小 autoindex_localtime on;# 显示文件时间 charset gbk,utf-8; }2.在ubuntu主机通过命令下载驱动包sudo curl -o drive8125.tar.bz2 http://192.168.0.1/software/r8125-9.008.00.tar.bz23.解压重命名后的驱动包tar -jxvf drive8125.tar.bz2进入解压目录可以看到可执行文件autorun.sh,Makefile README src执行脚本sudo sh autorun.sh最后执行网络ip分配命令dhclient enp1s0再通过ifconfig或ip address命令,可以看到已经分配ip四、配置自启动脚本vi /etc/rc.local写入#!/bin/bash dhclient exit 0执行命令sudo chmod 755 /etc/rc.local && systemctl enable rc-local && systemctl restart rc-local sudo systemctl status rc-local查看网络状态sudo systemctl status systemd-networkd
-
-
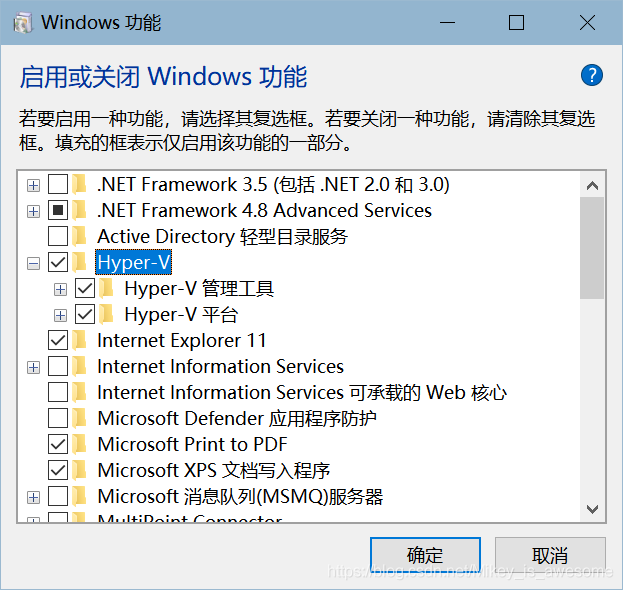
在Windows10专业版下使用docker安装oracle11g教程 一、安装Docker1、确保你的电脑是win10专业版家庭版的用户需自行升级至专业版才可使用。2、开启Hyper-VWin+R,输入appwiz.cpl,快速打开控制面板中的“程序和功能”在左侧点击“启用或关闭Windows功能”,把Hyper-V勾上3、下载并安装DockerDocker的官方下载地址二、使用Docker安装Oracle1、拉取镜像打开CMD,输入docker pull registry.cn-hangzhou.aliyuncs.com/helowin/oracle_11g拉取阿里云上的Oracle镜像2、启动Oracle镜像作为容器docker run -d -p 1521:1521 --name oracle11g registry.cn-hangzhou.aliyuncs.com/helowin/oracle_11g3、进入容器docker exec -it oracle11g bash4、配置环境变量使用root账号登录,命令为su root,密码为hellowin输入 vi /etc/profile ,修改配置文件在文件的最后面的 unset -f pathmunge的下一行,按i插入环境变量export ORACLE_HOME=/home/oracle/app/oracle/product/11.2.0/dbhome_2 export ORACLE_SID=helowin export PATH=$ORACLE_HOME/bin:$PATH按esc,再输入:wq!退出文件编辑。输入exit退出root用户,回到oracle用户。输入 source /etc/profile ,使配置文件生效。5、创建用户依次输入以下命令:sqlplus /nolog conn /as sysdba; alter user system identified by oracle;将system用户的密码设为oracleconn system/oracle; create user aaa identified by aaa;user后面接的是你要新建的用户名,by后面的是你新建的用户密码给新用户授权grant all privileges to aaa;三、使用Navicat连接数据库
-
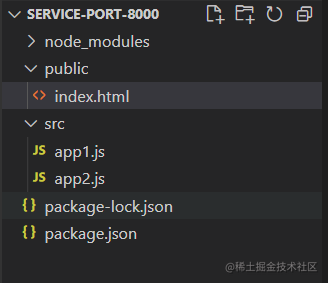
跨域请求如何携带cookie 前言最近在参加面试找工作,陆陆续续的面了两三家。其中面试官问到了一个问题:如何解决跨域问题?我巴巴拉拉的一顿说,大概了说了四种方法,然后面试官紧接着又问:那跨域请求怎么携带 cookie 呢?(常规的面试套路,一般都会顺着你的回答往深了问)由于之前的项目都是同源的,不牵涉跨域访问,所以一时没有回答出来,后来研究了下,所以有了这篇文章。阅读本文,你将学到:1.学会`withCredentials`属性; 2.学会`axios`配置`withCredentials`; 3.学会设置`Access-Control-Allow-Origin`属性; 4.学会设置`Access-Control-Allow-Credentials`属性; 5.学会解决跨域请求携带源站cookie的问题;一. 搭建一个跨域请求的环境思路:使用 express 搭建第一个服务A( http://localhost:8000 ),运行在8000端口上;A服务托管index.html(用于在前端页面发送网络请求)文件;在A服务中写一个处理请求的路由,加载index.html页面时,种下 cookie (这里种cookie为了在请求B服务时携带上);使用 express 搭建第二个服务B( http://localhost:8003 ),运行在8003端口上;在A服务托管的index.html页面去请求B服务,然后把 cookie 传过去;先看下代码结构,相对比较的简单:A服务的代码: // src/app1.js const express = require("express"); const app = express(); // `index.html` 加载时会请求login接口 // 设置`cookie` app.get("/login", (req, res) => { res.cookie("user", "jay", { maxAge: 2000000, httpOnly: true }); res.json({ code: 0, message: "登录成功" }); }); // 此接口是检测`cookie`是否设置成功,如果设置成功的话,浏览器会自动携带上`cookie` app.get("/user", (req, res) => { // req.headers.cookie: user=jay const user = req.headers.cookie.split("=")[1]; res.json({ code: 0, user }); }); // 托管`index.html`页面 // 这样的话在`index.html`中发起的请求,默认的源就是`http://localhost:8000` // 然后再去请求`http://localhost:8003`就会出现跨域了 app.use("/static", express.static("public")); app.listen("8000", () => { console.log("app1 running at port 8000"); });index.html的代码: <!DOCTYPE html> <html lang="en"> <head> <meta charset="UTF-8" /> <meta http-equiv="X-UA-Compatible" content="IE=edge" /> <meta name="viewport" content="width=device-width, initial-scale=1.0" /> <title>Document</title> </head> <body> <h2>this is index.html at port 8000</h2> <button id="button">发送同源请求</button> <button id="cross-button">发送跨域请求</button> <script src="https://static.4ce.cn/npm/axios/dist/axios.min.js"></script> <script> const button = document.querySelector("#button"); const crossButton = document.querySelector("#cross-button"); axios.get("http://localhost:8000/login", {}).then((res) => { console.log(res); }); // 发送同域请求 button.onclick = function () { axios.get("http://localhost:8000/user", {}).then((res) => { console.log(res); }); }; // 发送跨域请求 crossButton.onclick = function () { axios({ method: "get", url: "http://localhost:8003/anotherService", }).then((res) => { console.log(res); }); }; </script> </body> </html>B服务的代码:// src/app2.js const express = require("express"); const app = express(); // 定义一个接口,index.html页面请求这个接口就是跨域(因为端口不同) app.get("/anotherService", (req, res) => { res.json({ code: 0, msg: "这是8003端口返回的" }); }); app.listen("8003", () => { console.log("app2 running at port 8003"); });这个时候环境基本就搭建好了。二、解决跨域携带cookie问题首先我们先在A服务的index.html页面中得到一个cookie,运行A服务:npm install express -D node src/app1.js然后打开 http://localhost:8000/static/index.html : 没有问题的话,页面长这样:这个时候F12打开控制台:可以看到发送了一个 login 请求,并且设置了 cookie ,也可以选择浏览器控制台的Application页签,选中cookie,可以看到cookie的信息:然后我们点击页面上的发送同源请求按钮,可以看到发送了一个user请求,并且已经携带上了cookie:接下来刺激的画面来了,我们点击 发送跨域请求 按钮,出现了跨域请求的报错:重点:接下来开始解决跨域携带cookie问题:1.在前端请求的时候设置request对象的属性withCredentials为true;什么是withCredentials?XMLHttpRequest.withCredentials 属性是一个Boolean类型,它指示了是否该使用类似cookies,authorization headers(头部授权)或者TLS客户端证书这一类资格证书来创建一个跨站点访问控制(cross-site Access-Control)请求。在同一个站点下使用withCredentials属性是无效的。如果在发送来自其他域的XMLHttpRequest请求之前,未设置withCredentials 为true,那么就不能为它自己的域设置cookie值。而通过设置withCredentials 为true获得的第三方cookies,将会依旧享受同源策略,因此不能被通过document.cookie或者从头部相应请求的脚本等访问。// 修改跨域请求的代码 crossButton.onclick = function () { axios({ withCredentials: true, // ++ 新增 method: "get", url: "http://localhost:8003/anotherService", }).then((res) => { console.log(res); }); };这个时候再去发送一个跨域请求,你会发现依旧报错,但是我们仔细看下报错,意思是需要设置header的 Access-Control-Allow-Origin 属性:2.在服务端设置Access-Control-Allow-Origin我们修改B(app2.js)服务的代码:// 在所有路由前增加,可以拦截所有请求 app.all("*", (req, res, next) => { res.header("Access-Control-Allow-Origin", "http://localhost:8000"); next(); });修改完之后再次发送一个跨域请求,你会发现,又报错了(接近崩溃),但是跟之前报的错不一样了,意思大概就是Access-Control-Allow-Credentials这个属性应该设置为true,但是显示得到的是个'':3.在服务端设置Access-Control-Allow-Credentials再次修改B服务的代码(每次修改后需要重新运行):// 在所有路由前增加,可以拦截所有请求 app.all("*", (req, res, next) => { res.header("Access-Control-Allow-Origin", "http://localhost:8000"); res.header("Access-Control-Allow-Credentials", "true"); // ++ 新增 next(); });再发送一个跨域请求:可以看到,这个跨域请求已经请求成功并且返回数据了!而且也携带了A服务的cookie,这个时候已经大功告成了。三、总结前端请求时在 request 对象中配置 "withCredentials": true服务端在 response 的 header 中配置 "Access-Control-Allow-Origin", "http://xxx:${port}"服务端在 response 的 header 中配置 "Access-Control-Allow-Credentials", "true"


您的IP: