

搜索到
47
篇与
docker
的结果
-
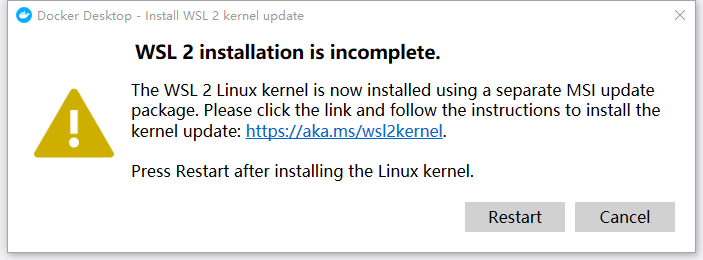
 win10安装docker踩坑 {card-describe title="问题描述"}这个问题就是系统的问题,Win10家庭版的可以没有安装wsl2的支持,专业版是支持的,可以在“启用或关闭Windows功能”中选择"虚拟机平台"和"适用于Linux的windows的子系统"后续可能会出现一个感叹号的提示"Install WSL 2 kernel update" The WSL 2 Linux kernel is not installed using a separate MSI update package.Please click the link and follow the instructions to install the kernel update:https://aka.ms/wsl2kernel.翻译过来就是你现在用的已经旧了,到这个网站下载最新的来更新换一下你的wsl2的包{/card-describe}下载linux-kernel 安装后重启docker即可
 -
jackett+sonarr+radarr全自动追剧 version: "3" services: service.jackett: image: linuxserver/jackett container_name: jackett ports: - 9117:9117 environment: - TZ=Asia/Shanghai - PUID=0 - PGID=0 volumes: - /volume3/docker/autodownload/JackettConfig:/config restart: unless-stopped service.Sonarr: image: linuxserver/sonarr:latest container_name: Sonarr ports: - 8989:8989 environment: - TZ=Asia/Shanghai - PUID=0 - PGID=0 volumes: - /volume3/docker/autodownload/SonarrConfig:/config - /volume1/video/tv:/tv - /volume1/video/downloads:/downloads restart: unless-stopped service.radarr: image: linuxserver/radarr:latest container_name: radarr ports: - 7878:7878 environment: - TZ=Asia/Shanghai - PUID=0 - PGID=0 volumes: - /volume3/docker/autodownload/RadarrConfig:/config - /volume1/video/movies:/movies - /volume1/video/downloads:/downloads restart: unless-stopped
-
docker安装gitlab 一、直接运行docker命令docker run -d --name gitlab \ --restart always \ -p 30001:30001 \ -p 30002:30002 \ -p 30003:22 \ -v /home/$USER/dockerfile/gitlab/etc:/etc/gitlab \ -v /home/$USER/dockerfile/gitlab/logs:/var/log/gitlab \ -v /home/$USER/dockerfile/gitlab/data:/var/opt/gitlab \ gitlab/gitlab-ce:latest额外参数:--hostname 192.168.1.8 \官方文档里有加这一条 --hostname 192.168.1.8 ,实测可以不写,只需手动改配置若要运行企业版,只需把最后 gitlab/gitlab-ce:latest 改成 gitlab/gitlab-ee:latest等安装完成后运行命令获取管理员账号root密码sudo docker exec -it gitlab grep 'Password:' /etc/gitlab/initial_root_password会返回一串密码: Password: akYzRtsctNfxnvVL2EFkK7wwvYXcQOi/spm2Yn/y77Y=二、修改配置:安装完成后,新建项目后,使用git-clone的时候会发现http和ssh的地址都不正确。所以要修改访问地址配置。1、http访问地址修改80端口的修改,我们需要在 gitlab.rb 文件中搜索 external_url :sudo vim /home/$USER/dockerfile/gitlab/etc/gitlab.rb在后续文本中搜索输入命令 ?external_url 回车?external_url## GitLab URL ##! URL on which GitLab will be reachable. ##! For more details on configuring external_url see: ##! https://docs.gitlab.com/omnibus/settings/configuration.html#configuring-the-external-url-for-gitlab ##! ##! Note: During installation/upgrades, the value of the environment variable ##! EXTERNAL_URL will be used to populate/replace this value. ##! On AWS EC2 instances, we also attempt to fetch the public hostname/IP ##! address from AWS. For more details, see: ##! https://docs.aws.amazon.com/AWSEC2/latest/UserGuide/instancedata-data-retrieval.html # external_url 'GENERATED_EXTERNAL_URL' external_url 'http://192.168.1.8:30002' ## Roles for multi-instance GitLab{callout color="#f0ad4e"}此处有30002端口,在网页端点击clone按钮的时候才会显示。前面docker运行命令的时候 30002:30002 两个端口号,后面那个端口号为镜像内部nginx自动配置的端口号,所以docker运行安装命令的时候,想要修改端口就必须前后两个端口都对应修改相同。否则clone的时候不会正确显示,也无法正确使用。{/callout}2、ssh访问地址修改在 gitlab.rb 文件中搜索 _ssh_portsudo vim /home/$USER/dockerfile/gitlab/etc/gitlab.rb在后续文本中搜索输入命令 ?_ssh_port 回车?_ssh_port### Wait for file system to be mounted ###! Docs: https://docs.gitlab.com/omnibus/settings/configuration.html#only-start-omnibus-gitlab-services-after-a-given-file-system-is-mounted # high_availability['mountpoint'] = ["/var/opt/gitlab/git-data", "/var/opt/gitlab/gitlab-rails/shared"] ### GitLab Shell settings for GitLab # gitlab_rails['gitlab_shell_ssh_port'] = 22 gitlab_rails['gitlab_ssh_host'] = '192.168.1.8' gitlab_rails['gitlab_shell_ssh_port'] = 30001 # gitlab_rails['gitlab_shell_git_timeout'] = 800 ### Extra customization # gitlab_rails['extra_google_analytics_id'] = '_your_tracking_id' # gitlab_rails['extra_google_tag_manager_id'] = '_your_tracking_id' # gitlab_rails['extra_one_trust_id'] = '_your_one_trust_id'3.生效配置:进入gitlab容器sudo docker exec -it gitlab /bin/sh重载配置和重启gitlabgitlab-ctl reconfigure && gitlab-ctl restart也可以直接重启容器。三、避坑实测直接运行官方文档带有 --hostname 192.168.1.8 的docker run命令后,使用git-clone会报错404。不带 --hostname 192.168.1.8 安装后修改配置,再重启时gitlab运行不起来。此时进行如下操作可行:隐藏内容,请前往内页查看详情
-
docker安装mysql 忽略大小写8.0.26docker run -d --name=db3307 -p 3307:3306 -e MYSQL_ROOT_PASSWORD=111111 mysql:8.0.26 --lower_case_table_names=15.7.35docker run -d --name=db3307 -p 3307:3306 -e MYSQL_ROOT_PASSWORD=111111 mysql:5.7.35 --lower_case_table_names=1需要挂载目录的话:docker run -p 3307:3306 --name=db3307 \ --privileged=true \ --restart unless-stopped \ -v /opt/docker/mysql/conf:/etc/mysql \ -v /opt/docker/mysql/logs:/logs \ -v /opt/docker/mysql/data:/var/lib/mysql \ -v /etc/localtime:/etc/localtime \ -e MYSQL_ROOT_PASSWORD=111111 \ -d mysql:8.0.26 \ --lower_case_table_names=1创建数据库命令CREATE DATABASE `testdb` CHARACTER SET 'utf8mb4' COLLATE 'utf8mb4_0900_ai_ci';解决问题Caused by: java.sql.SQLSyntaxErrorException: Expression #1 of SELECT list is not in GROUP BY clause and contains nonaggregated column 'cpms_v2.cpms_project.id' which is not functionally dependent on columns in GROUP BY clause; this is incompatible with sql_mode=only_full_group_bySHOW VARIABLES LIKE '%case%'; SET GLOBAL sql_mode='STRICT_TRANS_TABLES,NO_ZERO_IN_DATE,NO_ZERO_DATE,ERROR_FOR_DIVISION_BY_ZERO,NO_ENGINE_SUBSTITUTION';
-
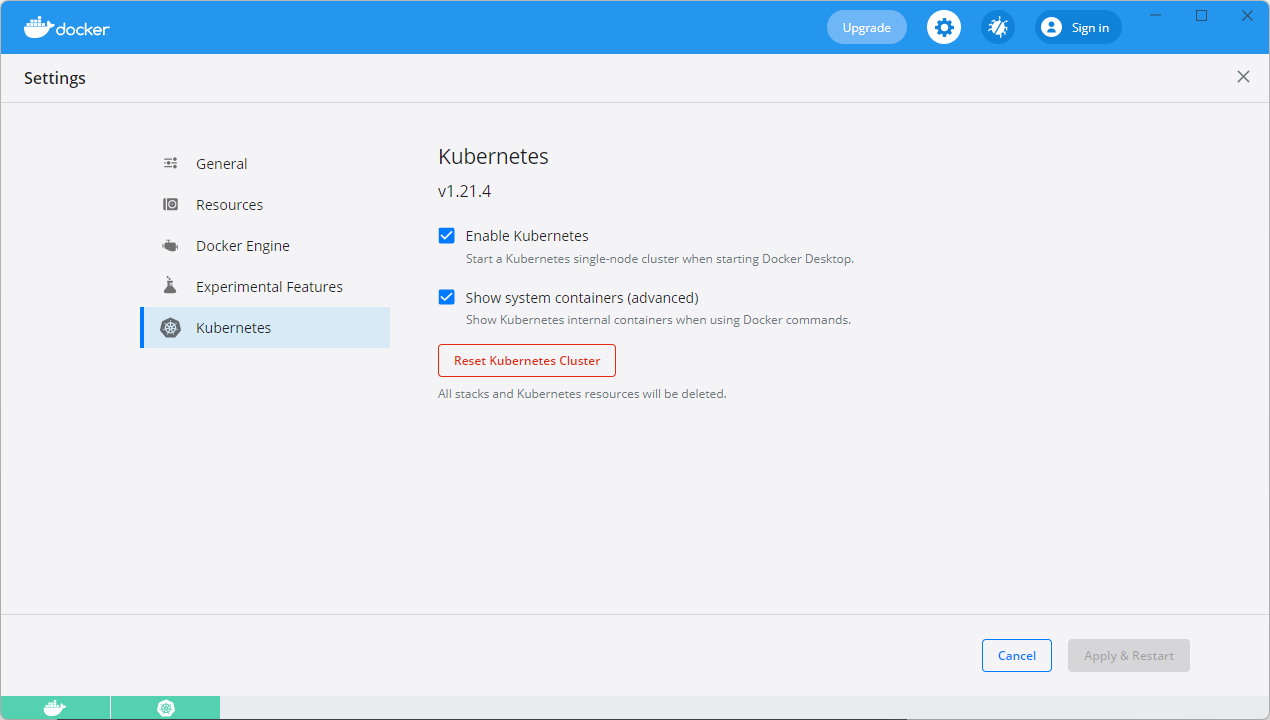
Docker Desktop启动Kubernetes 启用k8s后,等待安装完成。1.查看kubectl版本:kubectl version2.配置kubernetes:可选操作:切换Kubernetes运行上下文至docker-desktop(之前版本的context为docker-for-desktop)kubectl config use-context docker-desktop3.验证Kubernetes集群状态kubectl cluster-infokubectl get nodes4.配置Kubernetes控制台(1)部署Kubernetes dashboardkubectl apply -f https://raw.githubusercontent.com/kubernetes/dashboard/v1.10.1/src/deploy/recommended/kubernetes-dashboard.yaml或者kubectl apply -f https://raw.githubusercontent.com/kubernetes/dashboard/v2.0.0-rc5/aio/deploy/recommended.yaml或者kubectl create -f kubernetes-dashboard.yaml(2)检查kubernetes-dashboard应用状态kubectl get pod -n kubernetes-dashboard开启API Server访问代理kubectl proxy(3)通过URL访问kubernetes dashboardhttp://localhost:8001/api/v1/namespaces/kube-system/services/https:kubernetes-dashboard:/proxy/或http://localhost:8001/api/v1/namespaces/kubernetes-dashboard/services/https:kubernetes-dashboard:/proxy/(4)生成令牌Token(需用Windows PowerShell打开,CMD无法执行)$TOKEN=((kubectl -n kube-system describe secret default | Select-String "token:") -split " +")[1]kubectl config set-credentials docker-for-desktop --token="${TOKEN}"echo $TOKEN


您的IP: