

搜索到
70
篇与
develop
的结果
-
 uniapp获取图片base64 1.从相册中获取图片uni.chooseImage({ count: 1, // 默认9 sizeType: ['original', 'compressed'], // 可以指定是原图还是压缩图,默认二者都有 sourceType: ['album'], // 从相册选择 success: (res) => { this.img = res.tempFilePaths } })2.图片转成base64uni.getFileSystemManager().readFile({ filePath: this.img[0], encoding: 'base64', success: r => { console.log("base64===="+r.data) }, fail: (errr) => { uni.hideLoading() } })
 -
ES6常用知识点 1.不定参数function add(...a){ console.log(...a) }这里面 ... 就表示不定参数,该参数为一个数组,a为参数名,具体第几个可以用a[0]等表示,每个函数 最多声明一个 不定参数,而且一定要放在所有参数的 末尾 。不定参数对arguments对象的影响有不定参数,arguments对象包含所有传入的参数function add(b,...a){ console.log(...a) console.log(arguments[0],arguments[1]) }2.展开运算符可以获取数组中的所有数据let values = [3,54,45,23,6453,324] console.log(Math.max(...values)) //6453还可以加参数console.log(Math.max(...values,543545,43,54,23)) //5435453.对象展开复制const obj1 = { a: 10, b: 20 }; const obj2 = { ...obj1, c: 30 }; console.log(obj2); // {a: 10, b: 20, c: 30}合并对象 类似于 Object.assignconst obj1 = {a: 10}; const obj2 = {b: 20}; const obj3 = {c: 30}; // ES2018 console.log({...obj1, ...obj2, ...obj3}); // → {a: 10, b: 20, c: 30} // ES2015 console.log(Object.assign({}, obj1, obj2, obj3)); // → {a: 10, b: 20, c: 30}
-
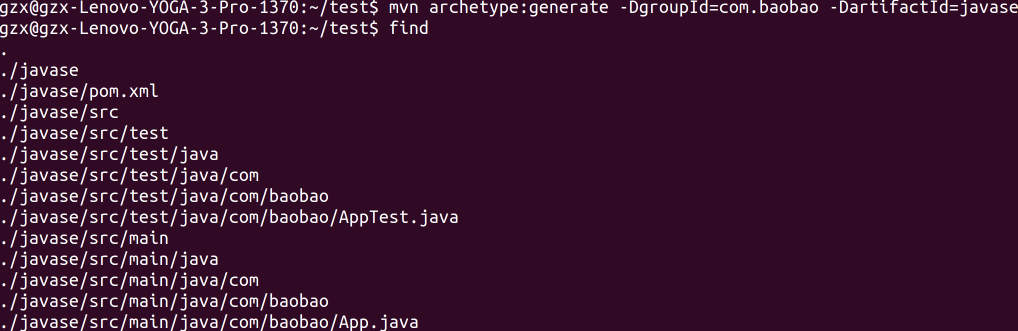
Ubuntu下Maven安装和使用 一、安装Maven安装Maven之前,必须安装了 JDK ,参考 JDK安装1.1 首先下载Maven的压缩包下载 apache-maven-3.8.8-bin.tar.gz1.2 解压到HOME目录tar zxvf apache-maven-3.8.8-bin.tar.gz -C ~1.3 在/etc/profile下添加环境变量编辑环境变量:sudo vi /etc/profile增加maven的HOME目录export M2_HOME=/home/gzx/apache-maven-3.8.8将Maven的bin目录添加到path路径PATH=$M2_HOME/bin:$PATH1.4 重载环境变量配置source /etc/profile1.5 验证环境变量是否存在echo $M2_HOMEecho $PATH1.6 验证Maven配置是否成功mvn -v1.7 修改本地仓库不修改配置的话,下载的文件都会保存到本地仓库 ~/.m2/repositoryMaven 中。这里指定本地仓库为 /home/gzx/Documents/Program/maven_localRepository 在文件 $M2_HOME/conf/settings.xml的localRepositor y的开头添加一行:<localRepository>/home/gzx/Documents/Program/maven_localRepository</localRepository>1.8 更改Maven的中央仓库为aliyun,提高下载jar的速度在 $M2_HOME/conf/settings.xml 下添加如下内容:<mirrors> <mirror> <id>alimaven</id> <name>aliyun maven</name> <url>https://maven.aliyun.com/repository/public</url> <mirrorOf>central</mirrorOf> </mirror> </mirrors>二、用Maven生成Java项目2.1 生成Java SE项目运行命令:mvn archetype:generate -DgroupId=com.baobao -DartifactId=javase 一路默认即可。注意是generate命令,而不是create命令。这样将在test目录下生成一个javase的目录,有测试目录和源码目录,同时生成相应的com/bao的java类包。这样的目录是Maven默认生成的,如下:可以看到javase的根目录下有一个pom.xml的配置文件,这个文件是Maven的核心文件,指定了依赖的jar包、源码的编码、打包方式等。<project xmlns="http://maven.apache.org/POM/4.0.0" xmlns:xsi="http://www.w3.org/2001/XMLSchema-instance" xsi:schemaLocation="http://maven.apache.org/POM/4.0.0 http://maven.apache.org/xsd/maven-4.0.0.xsd"> <!-- Maven的版本 --> <modelVersion>4.0.0</modelVersion> <!-- 下面三个是本项目区别于其他项目的坐标 --> <groupId>com.baobao</groupId> <artifactId>javase</artifactId> <version>1.0-SNAPSHOT</version> <!-- 打包成jar格式 --> <packaging>jar</packaging> <name>javase</name> <url>http://maven.apache.org</url> <!-- 源码的编码方式为UTF-8 --> <properties> <project.build.sourceEncoding>UTF-8</project.build.sourceEncoding> </properties> <!-- 声明本项目依赖的jar包 --> <dependencies> <dependency> <!-- 单元测试jar包,scope指定只在测试目录起作用 --> <groupId>junit</groupId> <artifactId>junit</artifactId> <version>3.8.1</version> <scope>test</scope> </dependency> </dependencies> </project>2.2 生成Java Web项目运行命令:mvn archetype:generate -DgroupId=com.baobao -DartifactId=javaee -DarchetypeArtifactId=maven-archetype-webapp这样将产生默认目录的web项目2.3 Maven的默认目录目录用途src/main/javaApplication/Library sourcessrc/main/resourcesApplication/Library resourcessrc/main/filtersResource filter filessrc/main/assemblyAssembly descriptorssrc/main/configConfiguration filessrc/main/scriptsApplication/Library scriptssrc/main/webappWeb application sourcessrc/test/javaTest sourcessrc/test/resourcesTest resourcessrc/test/filtersTest resource filter filessrc/siteSiteLICENSE.txtProject’s licenseNOTICE.txtNotices and attributions required by libraries that the project depends onREADME.txtProject’s readme三、Maven常用命令#清除target目录 mvn clean #编译: mvn compile #运行 mvn exec:java -Dexec.mainClass="主类全名" -Dexec.args="传递的参数" #跳过测试打包 mvn package -DskipTests #测试 mvn test #打包 mvn package #下载当前项目依赖的jar包的源码 mvn dependency:sources #下载当前项目依赖的jar包的文档 mvn dependency:resolve -Dclassifier=javadoc #安装jar包到本地仓库 mvn install #安装jar源码到本地仓库 mvn source:jar install #安装jar doc到本地仓库 mvn javadoc:jar install #上传jar包到本地仓库和私服 mvn deploy #安装某个目录下的pom到本地仓库 mvn install:install-file -DgroupId=a.tc -DartifactId=tcdev -Dversion=init-SNAPSHOT -Dpackaging=pom -Dfile=tcdev-init-SNAPSHOT.pom转载自:https://blog.csdn.net/ac_dao_di/article/details/54233520
-
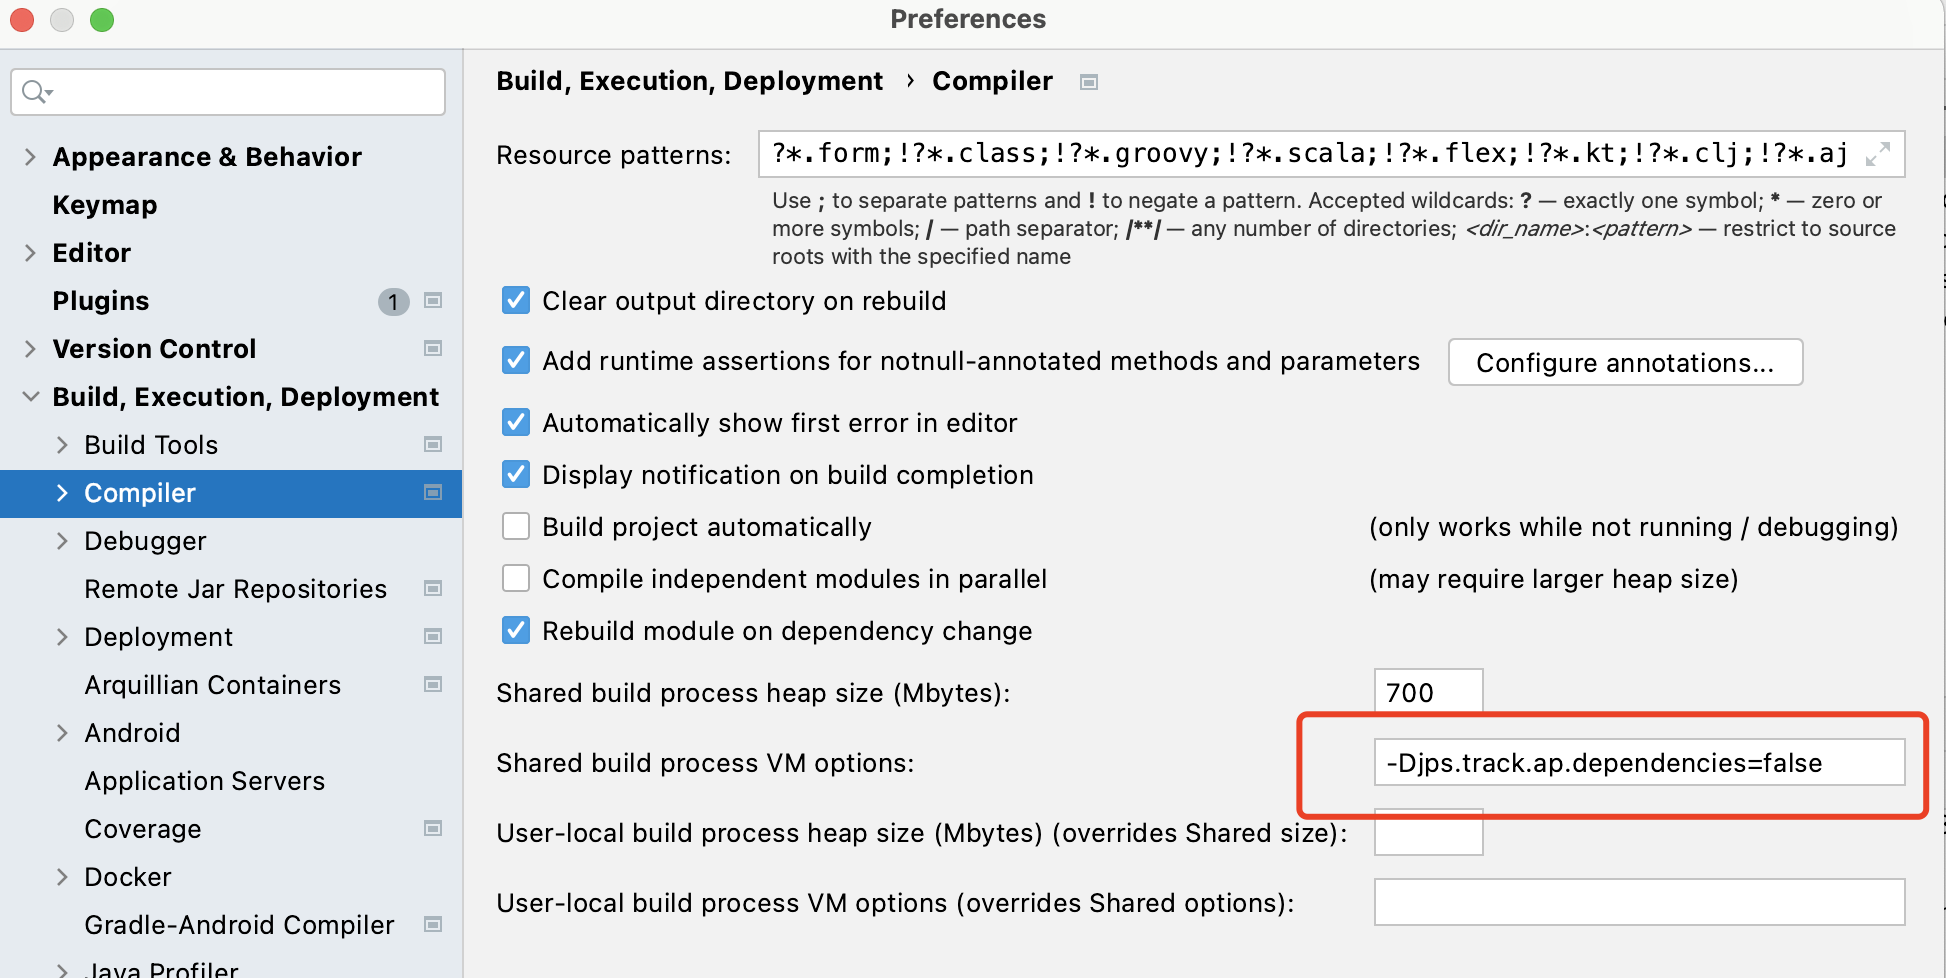
Idea清理项目缓存 idea 运行报错java: JPS incremental annotation processing is disabled.SpringCloud编译报错:java: JPS incremental annotation processing is disabled. Compilation results on partial recompilation may be inaccurate. Use build process “jps.track.ap.dependencies” VM flag to enable/disable incremental annotation processing environment.解决方案:1.增加:-Djps.track.ap.dependencies=false2.清理缓存
-
Maven:Failed to determine a suitable driver class 1.问题描述启动报错 Description: Failed to configure a DataSource: 'url' attribute is not specified and no embedded datasource could be configured. Reason: Failed to determine a suitable driver class Action: Consider the following: If you want an embedded database (H2, HSQL or Derby), please put it on the classpath. If you have database settings to be loaded from a particular profile you may need to activate it (no profiles are currently active). 2.原因发现找了很久,发现是编译后resources目录里的文件没有出现在target目录下, 也就是resources未编译因为我们运行时执行的是target目录下的文件, 而这里没有配置文件,所以报错了3.解决方案在 pom.xml 删掉以下修改打包方式的内容<packaging>pom</packaging>因为分模块管理,都会有一个父级项目,pom文件一个重要的属性就是packaging(打包类型),一般来说所有的父级项目的packaging都为pom,packaging默认类型jar类型,如果不做配置,maven会将该项目打成jar包 <groupId>com.atguigu.gulimall</groupId> <artifactId>gulimall-product</artifactId> <version>0.0.1-SNAPSHOT</version> <name>gulimall-product</name> <!-- <packaging>pom</packaging>--> <description>谷粒商城-商品服务</description> <properties>


您的IP: