

搜索到
381
篇与
moonjerx
的结果
-
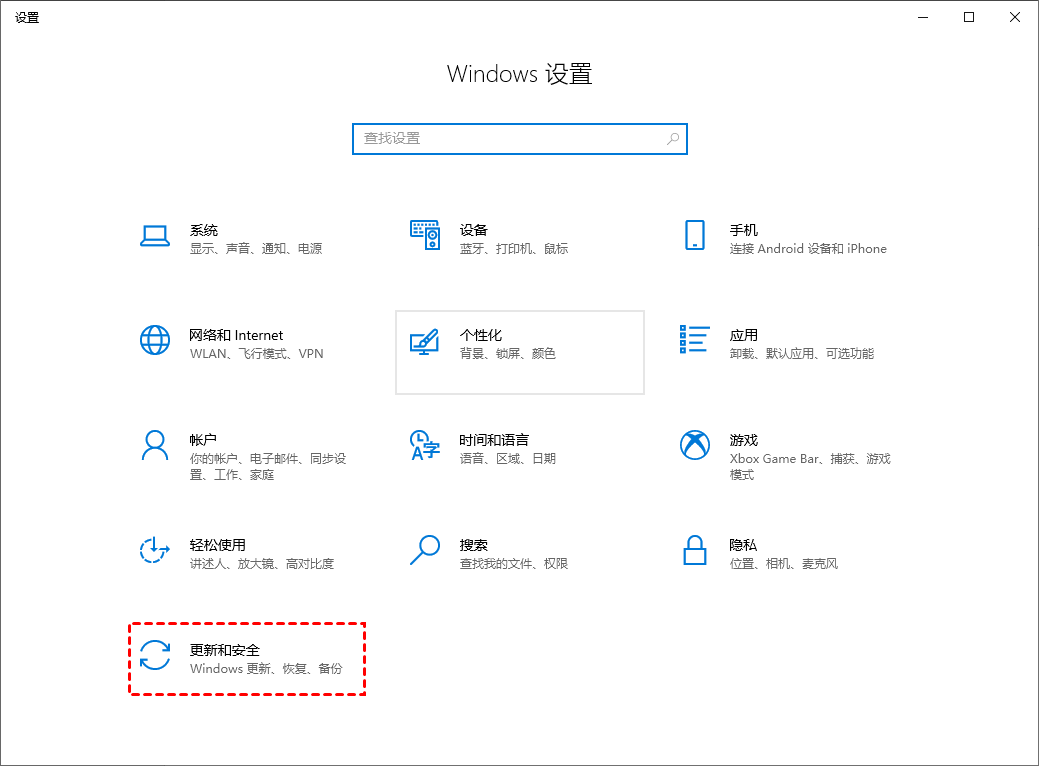
 如何有效的关闭Win10自动更新?(5种方法) Windows设置Windows Update服务本地组策略编辑器任务计划程序注册表编辑器注意:Win10自动更新关闭后,系统长期不更新当您再次尝试将系统更新到新版本系统,可能会导致系统出错。若您担心系统出错,可以提前对系统备份。方法1. Windows设置按 Windows + I 键,打开Windows设置,再单击 更新和安全然后,在Windows更新处,单击“高级选项”。在高级选项中,您可以将“更新选项”中项目全部关闭,或者选择“暂停更新”,但此暂停更新至多只能暂停35天,达到暂停限制后需先获取新的更新,然后才能再次暂停更新。方法2. 关闭Windows Update服务按“Windows + R”键,打开运行对话框,并输入“services.msc”,然后再单击“确定”。在弹出的服务窗口中,找到“Windows Update”选项并双击打开它。在弹出的“Windows Update的属性”对话框中,将“启动类型”设置为“禁用”。然后再单击“恢复”,将图中框选的部分都设置为“无操作”,再单击“应用”和“确定”。方法3. 本地组策略编辑器另一种Win10关闭自动更新方法就是通过更改本地组策略编辑器中的“配置自动更新”和“删除使用所有Windows更新功能的访问权限”选项来关闭Win10自动更新。按“Windows + R”键,打开运行对话框,并输入“gpedit.msc”,然后再单击“确定”。在弹出的本地组策略编辑中,依次单击“计算机配置” > “管理模板” > “Windows组件” > “Windows更新”,然后找到“配置自动更新”并双击打开它。在弹出的“配置自动更新”窗口中,选择“已禁用”,再单击“确定”。然后在“Windows更新”页面找到“删除使用所有Windows更新功能的访问权限”,并双击打开它。在弹出的窗口中,再勾选“已启用”,然后单击“确定”。方法4. 任务计划程序您也可以通过任务计划程序,将“Schedule Start”禁用,以实现Win10自动更新的关闭。按“Windows + R”键,打开运行对话框,并输入“taskschd.msc”,然后再单击“确定”。在任务计划程序窗口中,跳转到该路径“任务计划程序库/Microsoft/Windows/WindowsUpdate”。然后,选中“Schedule Start”,并在“所选项”中单击“禁用”。方法5. 注册表编辑器还有一种Win10关闭自动更新方法就是通过注册表编辑器,来彻底关闭Win10自动更新。具体操作步骤如下:按“Windows + R”键,打开运行对话框,并输入“regedit.exe”,然后再单击“确定”,在弹出的窗口中再点击“是”。进入注册表编辑器后,跳转到以下路径,并在右侧找到“Start”键并双击打开它。路径:HKEY_LOCAL_MACHINE\SYSTEM\CurrentControlSet\Services\UsoSvc在弹出的窗口中将“数值数据”改为“4”,并单击“确定”。然后再找到“FailureActions”键并双击进行编辑,将“00000010”和“00000018”行中的第五个数值,由原来的“01”改为“00”,再单击“确定”。
 -
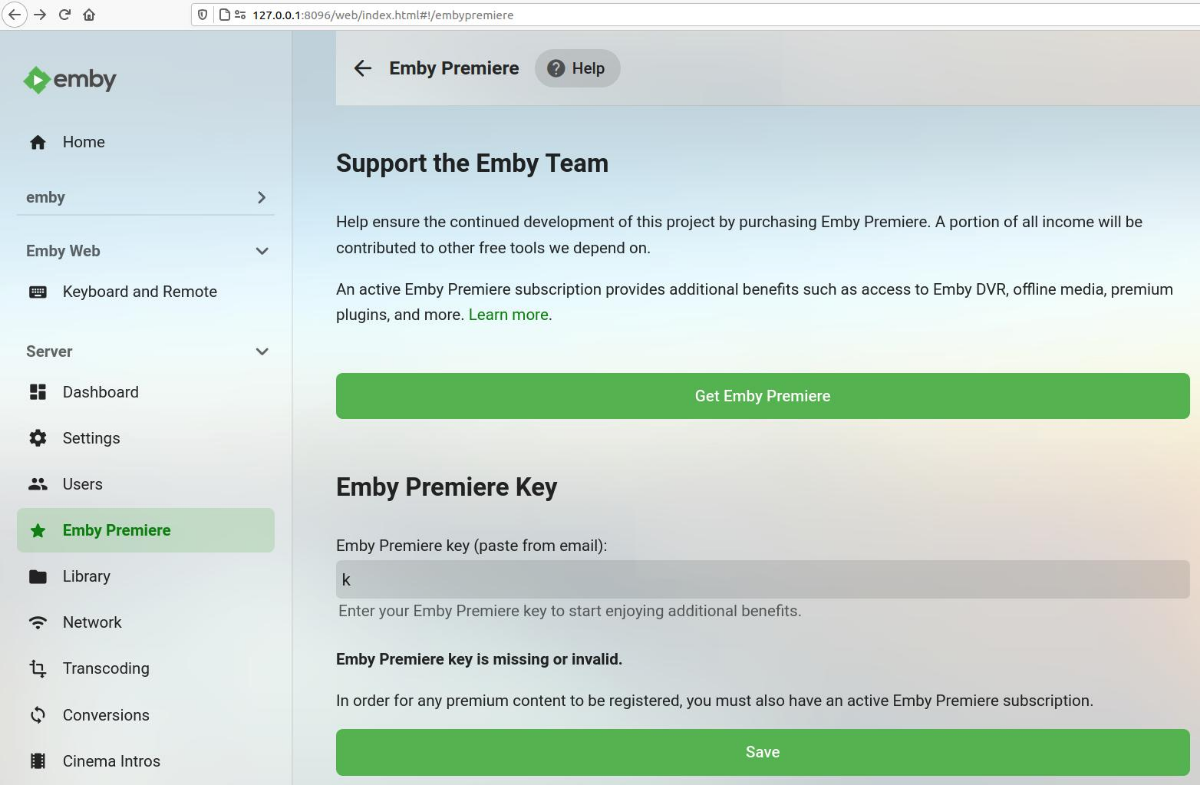
破解emby-server 前言现在很多服务的正常运行都依赖某个中心服务器,如果服务器升级或出现故障或者公司跑路,付费用户将无法继续正常使用。emby也是如此,程序要访问mb3admin.com确认你是付费用户才能使用更多的功能,不管你的个人网络还是他们服务器出问题,都将不能使用付费功能。网络上有一些解决方案,但大都需要搭建一个nginx伪装站点,生成ssl证书,emby服务器上添加证书并且修改hosts文件,客户端也需要修改hosts或者重定向mb3admin.com到伪站……我认为这样破解太过复杂了,用别人的伪站又担心不稳定。所以,就有了今天的尝试,修改emby程序,让其在不设置伪站的情况下也能使用最基本的是付费功能。破解过程需要用到下面两个工具:js-beautify dnSpy emby-server在Linux系统中安装于/opt/emby-server/,把此文件夹复制到hack-emby目录,并在此目录执行下面的脚本,美化javascript代码,以方便阅读。#!/bin/bash for f in $(find emby-server/ -name "*.js") do echo "$f" js-beautify "$f" > tmp mv tmp "$f" done在浏览器打开emby,在Emby Premiere页面随便输入一个key按保存后提示Emby Premiere key is missing or invalid.搜索定义并调用这个字符串的位置,发现仅在 system/dashboard-ui/embypremiere/embypremiere.html 中有调用这个字符串,同目录有个 embypremiere.js ,根据 MediaBrowser.Model.dll 中的某些函数返回值,执行相关的判断。修改 MediaBrowser.Model.dll 中的 get_IsMBSupporter 和 get_SupporterKey 的返回值后不再提示这个错误,不过也不像付费用户一样显示。还需要修改 emby-server/system/dashboard-ui/embypremiere/embypremiere.js 中的load(page)函数,去除访问 mb3admin.com 相关的代码,并且硬编码返回给付费用户的json数据才能正常显示。function load(page) { var apiClient; loading.show(), (apiClient = ApiClient).getJSON(apiClient.getUrl("Plugins/SecurityInfo")).then(function(info) { var key, postData; page.querySelector("#txtSupporterKey").value = info.SupporterKey || "", page.querySelector("#txtSupporterKey").classList.remove("invalidEntry"), page.querySelector(".notSupporter").classList.add("hide") var statusInfo = {"deviceStatus":"0","planType":"Lifetime","subscriptions":{}}; var statusLine, indicator = page.querySelector("#status-indicator .listItemIcon"), extendedPlans = page.querySelector("#extended-plans"); switch (extendedPlans.innerHTML = globalize.translate("MessagePremiereExtendedPlans", '<a is="emby-linkbutton" class="button-link" href="https://emby.media/premiere-ext.html" target="_blank">', "</a>"), statusInfo.deviceStatus) { default: statusLine = globalize.translate("MessagePremiereStatusGood", statusInfo.planType), indicator.classList.remove("expiredBackground"), indicator.classList.remove("nearExpiredBackground"), indicator.innerHTML = "", extendedPlans.classList.add("hide") } page.querySelector("#premiere-status").innerHTML = statusLine; var sub, subsElement = page.querySelector("#premiere-subs"); statusInfo.subscriptions && 0 < statusInfo.subscriptions.length ? (page.querySelector("#premiere-subs-content").innerHTML = (subs = statusInfo.subscriptions, key = info.SupporterKey, subs.map(function(item) { var itemHtml = "", makeLink = item.autoRenew && "Stripe" === item.store, tagName = makeLink ? "button" : "div"; return itemHtml += ("button" == tagName ? '<button type="button"' : "<div") + ' class="listItem listItem-button listItem-noborder' + (makeLink ? " lnkSubscription" : "") + '" data-feature="' + item.feature + '" data-key="' + key + '">', itemHtml += '<i class="listItemIcon md-icon">dvr</i>', itemHtml += '<div class="listItemBody two-line">', itemHtml += '<div class="listItemBodyText">', itemHtml += globalize.translate("ListItemPremiereSub", item.planType, item.expDate, item.store), itemHtml += "</div>", itemHtml += '<div class="listItemBodyText listItemBodyText-secondary">', itemHtml += globalize.translate("Stripe" === item.store ? item.autoRenew ? "LabelClickToCancel" : "LabelAlreadyCancelled" : "LabelCancelInfo", item.store), itemHtml += "</div>", itemHtml += "</div>", itemHtml += "</" + tagName + ">" })), (sub = page.querySelector(".lnkSubscription")) && sub.addEventListener("click", cancelSub), subsElement.classList.remove("hide")) : subsElement.classList.add("hide"), page.querySelector(".isSupporter").classList.remove("hide") //var subs, key }), loading.hide() }这里并不是最重要的,也许恰恰是最不重要的,因为我修改相关的代码后,Dashboard页面并没有显示徽章,不能使用付费主题,不能看live tv,右上角的升级会员按钮没有消失。这个程序以前是开源的,后来闭源后越来越不好破解了!(不过javascript和C#跟开源没啥区别)显示徽章Dashboard中徽章位于emby-server/system/dashboard-ui/css/images/supporter/supporterbadge.png,脚本system/dashboard-ui/dashboard/dashboard.js中的renderSupporterIcon函数使用了这个图标,调用这个函数的代码段为:function() { var apiClient = window.ApiClient; return apiClient ? connectionManager.getRegistrationInfo("themes", apiClient, { viewOnly: !0 }).then(function(result) { return { IsMBSupporter: !0 } }, function() { return { IsMBSupporter: !1 } }) : Promise.reject() }().then(function(pluginSecurityInfo) { DashboardPage.renderSupporterIcon(page, pluginSecurityInfo); var html, supporterPromotionElem = page.querySelector(".supporterPromotion"), isSupporter = pluginSecurityInfo.IsMBSupporter;只要把IsMBSupporter: !1改为 IsMBSupporter: !0 就可以显示徽章了。修改 emby-server/system/dashboard-ui/bower_components/emby-apiclient/connectionmanager.js 的getRegistrationInfo应该会更好,因为多处代码都调用了这个函数!key: "getRegistrationInfo", value: function(feature, apiClient, options) { var params = { serverId: apiClient.serverId(), deviceId: this.deviceId(), deviceName: this.deviceName(), appName: this.appName(), appVersion: this.appVersion(), embyUserName: "" }; (options = options || {}).viewOnly && (params.viewOnly = options.viewOnly); var cacheKey = getCacheKey(feature, apiClient, options), regInfo = JSON.parse(this.appStorage.getItem(cacheKey) || "{}"), timeSinceLastValidation = Date.now() - (regInfo.lastValidDate || 0); if (timeSinceLastValidation <= 864e5) return console.log("getRegistrationInfo returning cached info"), Promise.resolve(); var regCacheValid = timeSinceLastValidation <= 864e5 * (regInfo.cacheExpirationDays || 7); params.embyUserName = apiClient.getCurrentUserName(); var currentUserId = apiClient.getCurrentUserId(); if (currentUserId && "81f53802ea0247ad80618f55d9b4ec3c" === currentUserId.toLowerCase() && "21585256623b4beeb26d5d3b09dec0ac" === params.serverId.toLowerCase()) return Promise.reject(); var appStorage = this.appStorage, getRegPromise = ajax({ url: "https://mb3admin.com/admin/service/registration/validateDevice?" + paramsToString(params), type: "POST", dataType: "json" }).then(function(response) { return appStorage.setItem(cacheKey, JSON.stringify({ lastValidDate: Date.now(), deviceId: params.deviceId, cacheExpirationDays: response.cacheExpirationDays })), Promise.resolve() }, function(response) { var status = (response || {}).status; return console.log("getRegistrationInfo response: " + status), 403 === status ? Promise.reject("overlimit") : status && status < 500 ? Promise.reject() : function(err) { if (console.log("getRegistrationInfo failed: " + err), regCacheValid) return console.log("getRegistrationInfo returning cached info"), Promise.resolve(); throw err }(response) }); return regCacheValid ? (console.log("getRegistrationInfo returning cached info"), Promise.resolve()) : getRegPromise }把 if (timeSinceLastValidation <= 864e5) return console.log("getRegistrationInfo returning cached info"), Promise.resolve(); 中的 timeSinceLastValidation <= 864e5 替换为true,确保始终返回本地缓存中的数据,而不再需要找服务器验证。不过程序可能为了防止这个js文件被修改,在 emby-server/system/dashboard-ui/app.js 中有这么一段代码: define("connectionManagerFactory", [], getDynamicImport("./bower_components/emby-apiclient/connectionmanager.js"))运行时从emby-server/system/Emby.Web.dll中动态导入这个js文件,而不是使用 emby-server/system/dashboard-ui/bower_components/emby-apiclient/connectionmanager.js ,使用dnSpy的Hex Editor修改这几个字节就可以了。破解会员功能上面两个并没那么重要,上传、下载、电视直播和dvr这类功能才是更加实用的,这些都跟validateFeature有关系。同样,这个函数不仅存在于system/dashboard-ui/modules/registrationservices/registrationservices.js,在Emby.Web.dll中也有备份,我们要修改后者才能生效。{ validateFeature: function(feature, options) { return options = options || {}, console.log("validateFeature: " + feature), iapManager.isUnlockedByDefault(feature, options).then(function() { return showPeriodicMessageIfNeeded(feature) }, function() { var unlockableFeatureCacheKey = "featurepurchased-" + feature; if ("1" === appSettings.get(unlockableFeatureCacheKey)) return showPeriodicMessageIfNeeded(feature); var unlockableProduct = iapManager.getProductInfo(feature); if (unlockableProduct) { var unlockableCacheKey = "productpurchased-" + unlockableProduct.id; if (unlockableProduct.owned) return appSettings.set(unlockableFeatureCacheKey, "1"), appSettings.set(unlockableCacheKey, "1"), showPeriodicMessageIfNeeded(feature); if ("1" === appSettings.get(unlockableCacheKey)) return showPeriodicMessageIfNeeded(feature) } var unlockableProductInfo = unlockableProduct ? { enableAppUnlock: !0, id: unlockableProduct.id, price: unlockableProduct.price, feature: feature } : null; return iapManager.getSubscriptionOptions().then(function(subscriptionOptions) { if (0 < subscriptionOptions.filter(function(p) { return p.owned }).length) return Promise.resolve(); var registrationOptions = { viewOnly: options.viewOnly }; return connectionManager.getRegistrationInfo(iapManager.getAdminFeatureName(feature), connectionManager.currentApiClient(), registrationOptions).catch(function(errorResult) { return !1 === options.showDialog ? Promise.reject() : ("overlimit" === errorResult && (alertPromise = alertText("Your Emby Premiere device limit has been exceeded. Please check with the owner of your Emby Server and have them contact Emby support at support@emby.media if necessary.").catch(function() { return Promise.resolve() })), (alertPromise = alertPromise || Promise.resolve()).then(function() { var dialogOptions = { title: globalize.translate("HeaderUnlockFeature"), feature: feature }; return currentValidatingFeature = feature, showInAppPurchaseInfo(subscriptionOptions, unlockableProductInfo, dialogOptions) })); var alertPromise }) }) }) }, showPremiereInfo: showPremiereInfo }修改这个函数的返回值,并保存。替换掉系统中相关的文件,刷新浏览器缓存,就可以使用会员的大部分功能了。上图是破解前,即使正版程序,在局域网无法访问mb3admin.com时,可能也无法使用付费功能。下图为破解后,emby-server不再访问mb3admin.com而是直接返回缓存中/硬编码在dll和js中的数据。致敬作者:转载自https://bbs.pediy.com/thread-263534.htm
-
Ubuntu下Windows文件名乱码 {alert type="info"}把一些 Windows 上创建的文件发送到 Ubuntu 后,这些文件(文件夹、压缩包等)的文件名会乱码原因为 windows 下的文件名以 GBK 编码,而 Ubuntu 下的文件名为 utf-8 编码。{/alert}convmvconvmv 就是更改文件名编码方式的一个工具。比如如果未安装该命令,则先安装sudo apt-get install convmvsudo convmv -f gbk -t utf-8 -r --notest /home就是将 /home 目录下原来文件名是 gbk 编码方式的全部改为 utf-8 格式的。-f gbk #原来的编码方式 -t utf-8 #要转变成的编码方式 -r #递归处理目录下所有文件 --notest #非测试,立即执行iconviconv 是更改文件编码方式的一个工具:sudo iconv -f gbk -t utf-8 -o outfile sourcefile-f gbk #原来的编码方式 -t utf-8 #要转变成的编码方式 -o outfile #输出文件名 sourcefile #源文件名
-
ubuntu软件卸载重装方法 1.卸载软件和配置文件sudo apt-get --purge remove nginx删除 nginx,配置文件 –purge2.移除全部不使用的软件包sudo apt-get autoremove 3.列出nginx相关的软件dpkg --get-selections|grep nginx执行结果:zhangsan@xx-ubuntu:~$ dpkg --get-selections|grep nginx nginx install nginx-common install nginx-core install 4.删除nginx相关的软件sudo apt-get --purge remove nginx sudo apt-get --purge remove nginx-common sudo apt-get --purge remove nginx-core这样就可以完全卸载掉nginx包括配置文件5.查看nginx正在运行的进程,如果有就杀掉ps -ef |grep nginxzhangsan@xx-ubuntu:~$ ps -ef |grep nginx root 7875 2317 0 15:02 ? 00:00:00 nginx: master process /usr/sbin/nginx www-data 7876 7875 0 15:02 ? 00:00:00 nginx: worker process www-data 7877 7875 0 15:02 ? 00:00:00 nginx: worker process www-data 7878 7875 0 15:02 ? 00:00:00 nginx: worker process www-data 7879 7875 0 15:02 ? 00:00:00 nginx: worker process stephen 8321 3510 0 15:20 pts/0 00:00:00 grep --color=auto nginx6.kill nginx进程sudo kill -9 7875 7876 7877 7879 7.全局查找与nginx相关的文件sudo find / -name nginx* 8.依依删除4列出的所有文件sudo rm -rf file 9.再次重装sudo apt-get update && sudo apt-get install nginx
-
docker运行的所有服务无法远程访问 问题描述{alert type="info"} 在新安装的 ubuntu server 22.0.4 系统过程中本来勾选了安装 docker stable 版本,但实际上进入系统后却没有安装 docker 。只能通过 sudo apt-get install -y docker.io 安装。 安装成功后安装了 mysql 8.0.26 镜像容器和 gitlab 镜像容器,本地使用 telnet 127.0.0.1 3306 是通的,且进入容器内用 root 账户登录也正常,说明容器服务是正常的。但是局域网内其他设备却无法连通 mysql 服务。并非本地主机或者局域网远程主机防火墙阻挡,因为 22 端口是可以正常访问的,且本地防火墙状态全关。 最后解决问题了,知道问题是docker的虚拟网关存在问题。{/alert}一、网上参考解决方案原因:docker网卡地址冲突sudo apt-get install -y bridge-utils设置网卡信息sudo service docker stop sudo ip link set dev docker0 down sudo brctl delbr docker0 sudo iptables -t nat -F POSTROUTING sudo brctl addbr docker0 sudo ip addr add 172.17.0.1/24 dev docker0 sudo ip link set dev docker0 up 二、实际解决问题修改 daemon.json 文件centos上安装后有此文件,但是 ubuntu 上需要自己创建文件。vi /etc/docker/daemon.json示例: { "registry-mirrors": [ "https://cqiunwxe.mirror.aliyuncs.com", "https://registry.docker-cn.com", "http://hub-mirror.c.163.com", "https://docker.mirrors.ustc.edu.cn", "https://cr.console.aliyun.com", "https://mirror.ccs.tencentyun.com" ], "bip": "172.16.10.1/24" }重载配置并重启docker服务sudo systemctl daemon-reload && sudo systemctl restart docker


您的IP: