

搜索到
381
篇与
moonjerx
的结果
-
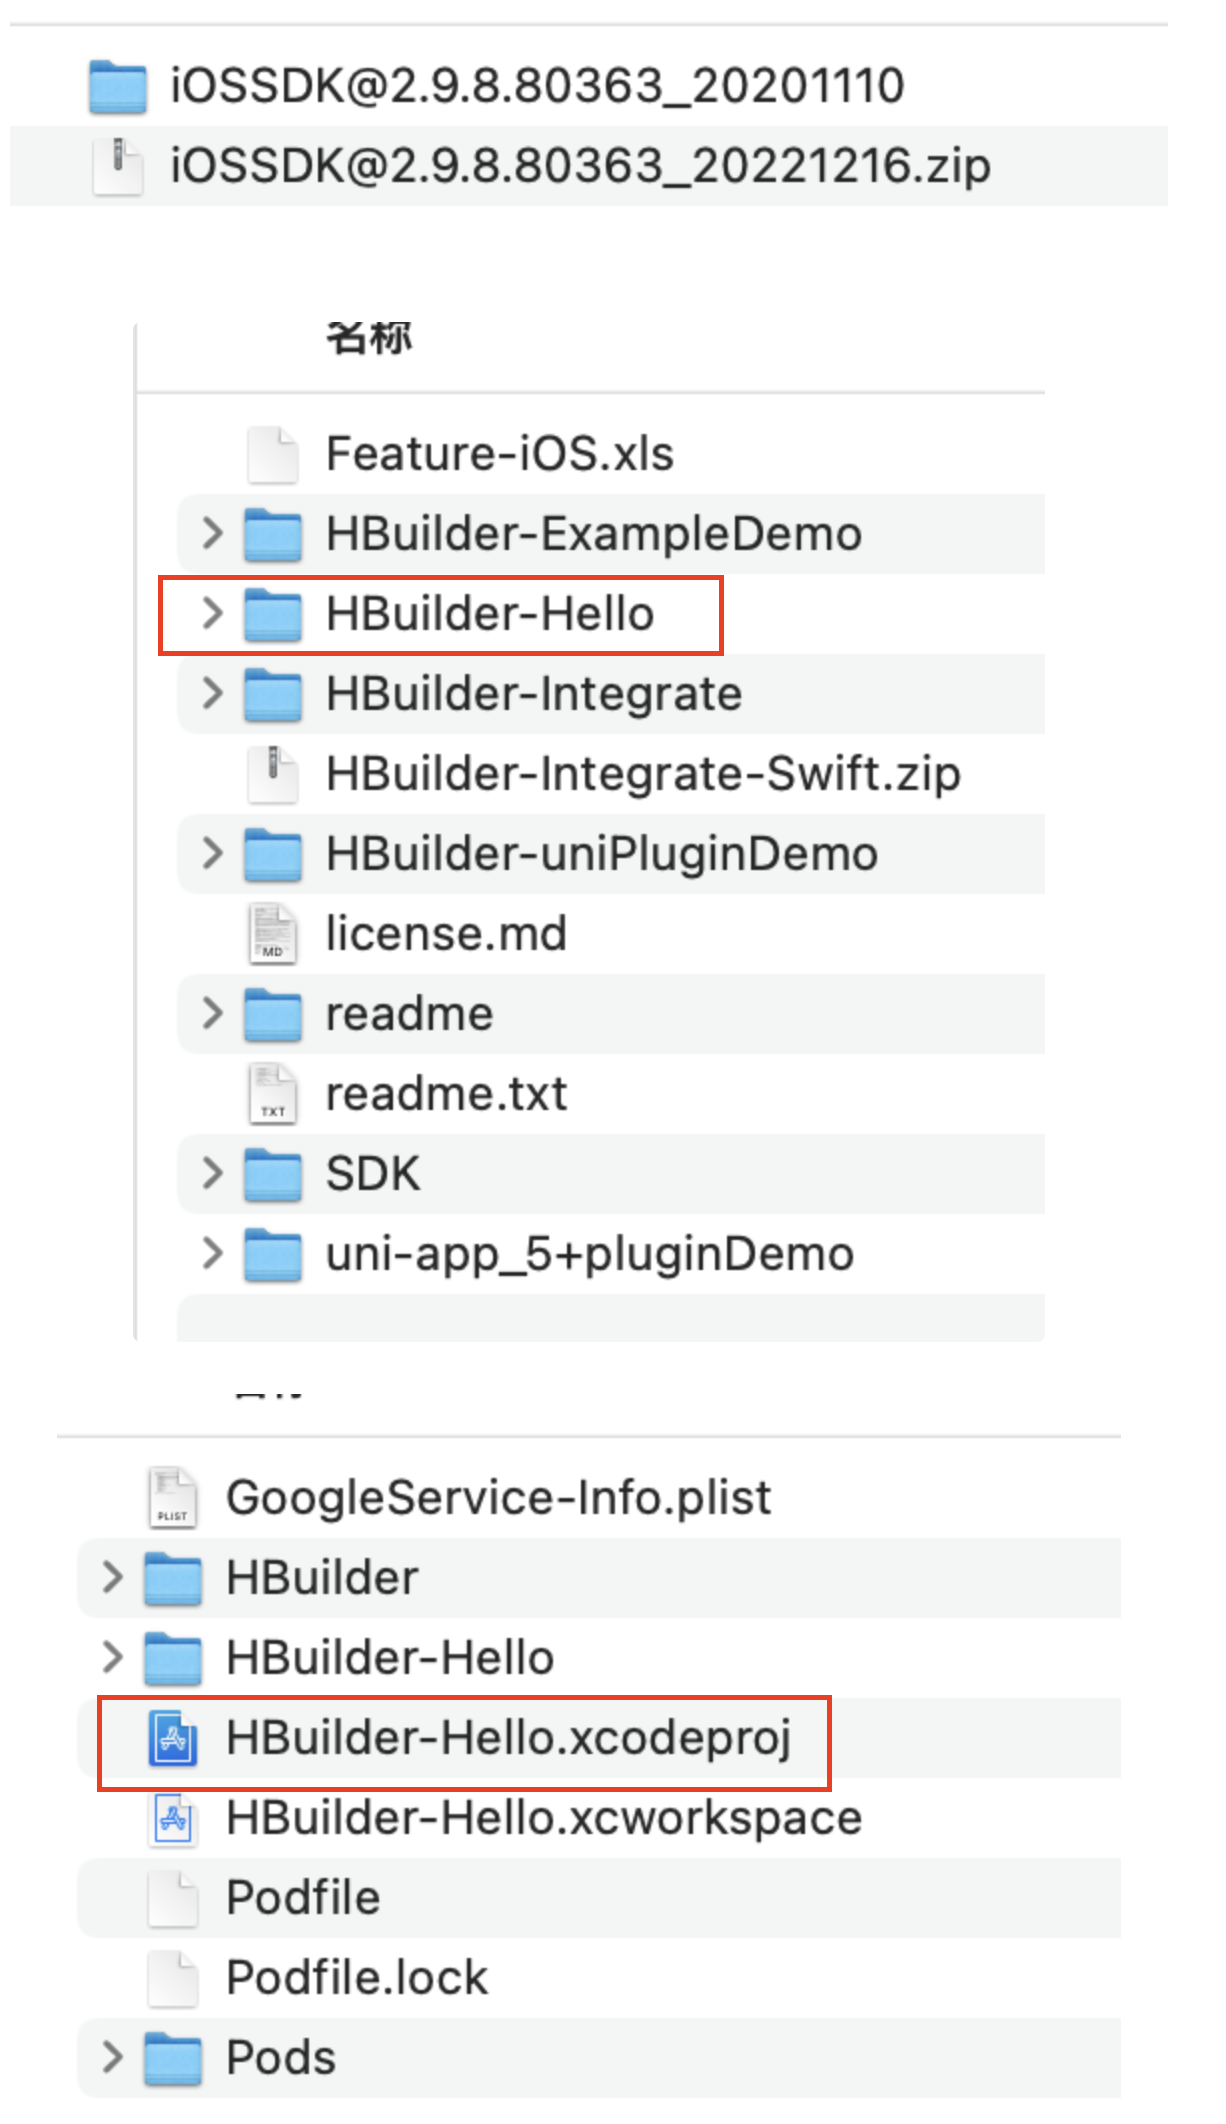
 uniapp打包www文件使用ios基座打原生ipa包 1.打开ios基座工程文件本地先安装好xcode开发软件,依次打开:iOSSDK@2.9.8.80363_20201110 👉 HBuilder-Hello 👉 HBuilder-Hello.xcodeproj 2.放入uniapp资源文件www到指定目录3.配置好对应证书debug对应开发证书release对应分发证书4.配置好版本号version为最新版本号build为打包次数,每次打包需比上一次数值大5.打包提交可以在Organizer找到历史打包记录6.提交上传App Store点击 Distribute App 按钮提交正式包注:证书配置正确,当前登录的开发者账号正确的话,正常情况都能顺利提交。偶尔可能遇到苹果开发者网站自身服务或网络不畅会出现提交不成功,多试几次即可。视具体报错原因百度一般能查到解决方案。
 -
uniapp微信小程序 new Date() 在ios设备无效问题解决 起因 后端返回的时间格式是这种 2022-09-08 10:58:31 ,前端需要显示时间戳使用方法格式化日期 new Date('2022-09-08 10:58:31')。在安卓手机h和模拟器上没问题,但是再ios手机上就出错了, new Date() 获取不到毫秒数。查了很多才发现,是在ios设备中不支持 new Date("2022-09-08 10:58:31") 的使用。解决方案let time = new Date("2022-09-08 10:58:31")需改为let time = new Date("2022/09/08 10:58:31")所以就要把 - 替换成 /let date = "2022-09-08 10:58:31" let time = new Date(date.replaceAll('-', '/')).getTime() console.log(date.replaceAll('-', '/')); // 2022/09/08 10:58:31 console.log(time);//1662605911000如果对new Date()事件处理不太了解的,可以点下方文章JS中对new Date()使用和详解 如果大家对replaceAll也不太清楚,在这里前端replaceAll和replace区别 原文摘自
-
uniAPP 如何不让输入框不失去焦点( 阻止点击默认事件) 场景:输入框与发送按钮是兄弟关系。输入框获取焦点时会唤起键盘,点击发送的输入框会失去焦点。要求:点击发送按钮时,输入框不能失去焦点,键盘一直呈现唤出状态分析: 当我们点击某一个元素时,这个元素就会默认获取焦点,在上述场景中,输入框在获取焦点时会唤出键盘,但是由于发送按钮与输入框不是同一个dom元素,所以点击发送按钮时输入框就会失去焦点,发送按钮就会回去焦点,键盘就是收起。 如果阻止点击dom元素的默认获得焦点这个事情,那么上一个获取焦点的dom元素就不会失去焦点。也就是输入框不会失去焦点,键盘就不会收起操作:发送按钮的事件用 @touchend.prevent=""touchend(触屏事件)prevent(阻止默认事件)例子:<view class="send" :class="sendMsgClass" @touchend.prevent="sendText"> <view class="btn">发送</view> </view>
-
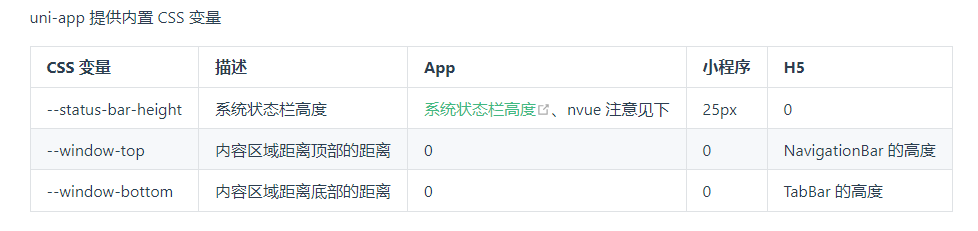
IOS安全内边距safe-area-inset-bottom IOS全面屏底部有小黑线,存在安全距离。位于底部的元素会被黑线阻挡,可以使用以下样式: padding-bottom: constant(safe-area-inset-bottom); /* 兼容 iOS < 11.2 */ padding-bottom: env(safe-area-inset-bottom); /* 兼容 iOS >= 11.2 */获取高度时,可用: height: calc(100% - constant(safe-area-inset-bottom)); height: calc(100% - env(safe-area-inset-bottom));{callout color="red"}tips:先使用constant 再使用 env{/callout}自定义顶部导航栏顶部存在状态栏,也就是显示信号、时间等信息的状态栏padding-top: var(--status-bar-height);{callout color="#ef4d4d"} 可以在页面的最外层的盒子加内上边距 padding-top: var(–status-bar-height) 避免顶部导航栏与状态栏重叠;并且需要给最外层盒子设置背景色与页面背景色一致,不然会出现状态栏的背景色和页面背景色不一致的情况{/callout}uniapp css变量uniapp css变量 注意:var(--status-bar-height) 此变量在微信小程序环境为固定 25px,在 App 里为手机实际状态栏高度。当设置 "navigationStyle":"custom" 取消原生导航栏后,由于窗体为沉浸式,占据了状态栏位置。此时可以使用一个高度为 var(--status-bar-height) 的 view 放在页面顶部,避免页面内容出现在状态栏。由于在 H5 端,不存在原生导航栏和 tabbar,也是前端 div 模拟。如果设置了一个固定位置的居底 view,在小程序和 App 端是在 tabbar 上方,但在 H5 端会与 tabbar 重叠。此时可使用--window-bottom,不管在哪个端,都是固定在 tabbar 上方。目前 nvue 在 App 端,还不支持 --status-bar-height变量,替代方案是在页面 onLoad 时通过 uni.getSystemInfoSync().statusBarHeight 获取状态栏高度,然后通过 style 绑定方式给占位 view 设定高度。下方提供了示例代码代码块快速书写 css 变量的方法是:在 css 中敲 hei,在候选助手中即可看到 3 个 css 变量。(HBuilderX 1.9.6 以上支持)示例 1 - 普通页面使用 css 变量:<template> <!-- HBuilderX 2.6.3+ 新增 page-meta, 详情:https://uniapp.dcloud.io/component/page-meta --> <page-meta> <navigation-bar /> </page-meta> <view> <view class="status_bar"> <!-- 这里是状态栏 --> </view> <view>状态栏下的文字</view> </view> </template> <style> .status_bar { height: var(--status-bar-height); width: 100%; } </style><template> <view> <view class="toTop"> <!-- 这里可以放一个向上箭头,它距离底部tabbar上浮10px--> </view> </view> </template> <style> .toTop { bottom: calc(var(--window-bottom) + 10px); } </style>示例 2 - nvue 页面获取状态栏高度<template> <view class="content"> <view :style="{ height: iStatusBarHeight + 'px'}"></view> </view> </template> <script> export default { data() { return { iStatusBarHeight: 0, }; }, onLoad() { this.iStatusBarHeight = uni.getSystemInfoSync().statusBarHeight; }, }; </script>知识点扫盲下面把相关知识点整理如下: env() 与 constant() 设置安全区域,是css里IOS11新增的属性,webkit的css函数,用于设定安全区域与边界的距离,有4个预定义变量:safe-area-inset-top: 安全区域距离顶部边界的距离safe-area-inset-left: 安全区域距离左边界的距离safe-area-inset-right: 安全区域距离右边界的距离safe-area-inset-bottom: 安全区域距离底部边界的距离获取上安全距离:env(safe-area-inset-top)获取左安全距离:env(safe-area-inset-left)获取右安全距离:env(safe-area-inset-right)获取下安全距离:env(safe-area-inset-bottom)需要的注意一点:H5网页设置 viewport-fit=cover 的时候才会生效,小程序里的 viewport-fit 默认是 cover 。为了更好的理解上文意思,我们来看一下未适配的底部效果:适配后的效果:
-
ubuntu 更改文件夹拥有者和权限 在 Ubuntu18.04 上安装 pyspyder ,遇到权限不够的问题,发现在安装 anaconda3 的时候,文件夹的拥有者是 root 。作为新手只有寻找如何更改文件夹的拥有者,或者修改文件夹的权限。Ubuntu中有两个修改命令可以用到, 「change mode」 & 「change owner」 即 chmod 以及 chown ,其中可以用 递归参数 -R 来实现更改所有子文件和子目录的权限。1、利用chmod修改权限:对Document/目录下的所有子文件与子目录执行相同的权限变更:chmod -R 700 Document/-R 参数是递归,处理目录下的所有文件以及子文件夹700 是变更后的权限表示(只有所有者有读和写以及执行的权限)Document/ 是需要执行的目录常用方法如下:sudo chmod 600 ××× (只有所有者有读和写的权限) sudo chmod 644 ××× (所有者有读和写的权限,组用户只有读的权限) sudo chmod 700 ××× (只有所有者有读和写以及执行的权限) sudo chmod 666 ××× (每个人都有读和写的权限) sudo chmod 777 ××× (每个人都有读和写以及执行的权限)其中 ××× 指文件名(也可以是文件夹名,不过要在 chmod 后加 -ld )。2、利用chown改变所有者:对 Document/ 目录下的所有文件与子目录执行相同的所有者变更,修改所有者为users用户组的username用户chown -R username:users Document/username:users users用户组的username,用户组参数不是必须有。下面这样也是可以的:chown -R username Document/更改目录下所有文件及子目录的拥有组chgrp -R username mydir


您的IP: