

搜索到
381
篇与
moonjerx
的结果
-
 Dockerfile常见指令 当然,下面是每个Dockerfile参数的实际例子:指定基础镜像:FROM ubuntu:latest使用最新版本的Ubuntu作为基础镜像。设置镜像的作者:MAINTAINER John Doe <johndoe@example.com>设置镜像的作者为John Doe,并提供联系方式。设置环境变量:ENV APP_PORT=8080设置名为APP_PORT的环境变量,值为8080。设置工作目录:WORKDIR /app将/app目录设置为容器内的工作目录。复制文件:COPY app.jar /app/app.jar将本地的app.jar文件复制到镜像的/app目录下。添加文件或目录:ADD https://example.com/file.tar.gz /tmp/从指定URL下载file.tar.gz文件,并将其解压缩到镜像的/tmp目录下。运行命令:RUN apt-get update && apt-get install -y curl在镜像中执行apt-get update和apt-get install命令,安装curl工具。暴露端口:EXPOSE 8080声明容器将监听的端口为8080。定义镜像的入口点:ENTRYPOINT ["java", "-jar", "app.jar"]指定在容器启动时执行java -jar app.jar命令。定义容器的启动命令:CMD ["java", "-Xmx512m", "-jar", "app.jar"]设置容器启动时默认执行的命令为java -Xmx512m -jar app.jar。设置镜像标签:LABEL version="1.0" description="My custom image"为镜像添加自定义标签,包括版本号和描述信息。设置镜像的用户:USER myuser指定在容器中以myuser用户身份运行。定义容器间的挂载点:VOLUME /data声明容器的挂载点为/data,可以将宿主机上的目录与容器内的/data目录进行挂载。这些例子展示了每个Dockerfile参数的用法和示例,可以根据具体需求和场景进行调整和扩展。
 -
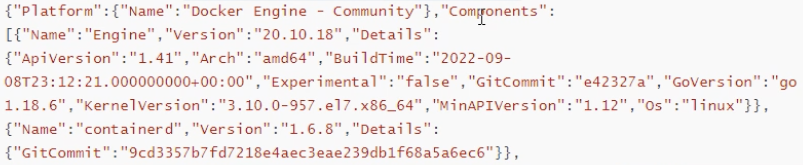
idea集成docker 修改docker.servicevim /usr/lib/systemd/system/docker.service修改ExecStart这一行,开启2375端口远程访问[Unit] Description=Docker Application Container Engine Documentation=https://docs.docker.com After=network-online.target docker.socket firewalld.service containerd.service time-set.target Wants=network-online.target containerd.service Requires=docker.socket [Service] Type=notify # the default is not to use systemd for cgroups because the delegate issues still # exists and systemd currently does not support the cgroup feature set required # for containers run by docker #ExecStart=/usr/bin/dockerd -H fd:// --containerd=/run/containerd/containerd.sock ExecStart=/usr/bin/dockerd -H fd:// --containerd=/run/containerd/containerd.sock -H tcp://0.0.0.0:2375 -H unix://var/run/docker.sock ExecReload=/bin/kill -s HUP $MAINPID TimeoutStartSec=0 RestartSec=2 Restart=always # Note that StartLimit* options were moved from "Service" to "Unit" in systemd 229. # Both the old, and new location are accepted by systemd 229 and up, so using the old location # to make them work for either version of systemd. StartLimitBurst=3 # Note that StartLimitInterval was renamed to StartLimitIntervalSec in systemd 230. # Both the old, and new name are accepted by systemd 230 and up, so using the old name to make # this option work for either version of systemd. StartLimitInterval=60s # Having non-zero Limit*s causes performance problems due to accounting overhead # in the kernel. We recommend using cgroups to do container-local accounting. LimitNOFILE=infinity LimitNPROC=infinity LimitCORE=infinity # Comment TasksMax if your systemd version does not support it. # Only systemd 226 and above support this option. TasksMax=infinity # set delegate yes so that systemd does not reset the cgroups of docker containers Delegate=yes # kill only the docker process, not all processes in the cgroup KillMode=process OOMScoreAdjust=-500 [Install] WantedBy=multi-user.target说明: Intelli] IDEA通过2375端口远程连接到Linux系统中的Docker.重载配置并重启docker服务systemctl daemon-reload && systemctl restart docker3、开放端口firewall -cmd --zone=public --add-port=2375/tcp --permanent && firewall -cmd --reload测试接口curl http://192.168.3.100:2375/version看到类似如下内容[WARNING] No entry found in settings.xml for serverId=docker-mx, cannot configure authentication for that registry出现这个警告是因为settings.xml文件没有配置镜像仓库登录账号密码信息 <plugin> <groupId>com.spotify</groupId> <artifactId>docker-maven-plugin</artifactId> <version>1.2.2</version> <executions> <execution> <id>build-image</id> <phase>package</phase> <goals> <goal>build</goal> </goals> </execution> <!-- <execution>--> <!-- <id>tag-image</id>--> <!-- <phase>package</phase>--> <!-- <goals>--> <!-- <goal>tag</goal>--> <!-- </goals>--> <!-- <configuration>--> <!-- <image>${project.name}</image>--> <!-- <newName>1${project.name}</newName>--> <!-- </configuration>--> <!-- </execution>--> <execution> <id>push-image</id> <phase>deploy</phase> <goals> <goal>push</goal> </goals> <configuration> <imageName>${project.name}</imageName> <imageTags> <imageTag>v${project.version}</imageTag> </imageTags> </configuration> </execution> </executions> <configuration> <!--docker api地址,构建镜像是通过api调用在192.168.245.133上构建,并推送到registryUrl上--> <dockerHost>${docker.remote.host}</dockerHost> <buildArgs> <appName>${project.build.finalName}</appName> </buildArgs> <serverId>docker-mx</serverId> <!--私有仓库地址--> <registryUrl>${docker.registry.url}</registryUrl> <!--镜像名称,必须带仓库地址,否则只会push到docker.io--> <imageName>${docker.registry.url}/${project.name}:v${project.version}</imageName> <imageTags> <imageTag>v${project.version}</imageTag> </imageTags> <!-- 指定dockerfile所在目录 --> <!--<dockerDirectory>${project.build.directory}</dockerDirectory>--> <!--<dockerDirectory>src/main/docker</dockerDirectory>--> <!-- All resources will be copied to this directory before building the image. --> <!--<buildDirectory>${project.basedir}</buildDirectory>--> <!--是否推送镜像--> <!--<pushImage>true</pushImage>--> <!--推送后是否覆盖已存在的标签镜像--> <forceTags>true</forceTags> <!--资源,类似Dockerfile里的 ADD --> <resources> <resource> <!--在生成的docker目录下,新建目录--> <targetPath>/</targetPath> <!--docker-build时生成docker目录位置--> <directory>${project.build.directory}</directory> <!-- <directory>${project.build.directory}</directory>--> <include>${project.build.finalName}.jar</include> <filtering>true</filtering> </resource> </resources> <!--基础镜像--> <baseImage>openjdk:8-jdk-alpine</baseImage> <runs> <run>echo "App is: ${project.name}"</run> <!--<run>mkdir /app</run>--> </runs> <workdir>/app</workdir> <exposes>${profiles.port}</exposes> <!--启动容器里执行的命令:注意这里的格式,格式不对,会运行不成功的--> <!--<entryPoint>["java", "-version"]</entryPoint>--> <entryPoint>["java", "-jar","/${project.build.finalName}.jar"]</entryPoint> </configuration> </plugin>控制台提示报错[ERROR] Failed to execute goal com.spotify:docker-maven-plugin:1.2.2:build (default-cli) on project mxhello: Exception caught: java.io.IOException: Cannot run program "docker-credential-desktop": error=2, No such file or directory -> [Help 1]将 credsStore 改成 credStore ,但是别重启本地docker,否则这一项配置会被清除
-
-
ssh连接远程主机时收到警告“REMOTE HOST IDENTIFICATION HAS CHANGED” 一、报错admin@00e04c68075c ~ % ssh superpc@192.168.3.100 @@@@@@@@@@@@@@@@@@@@@@@@@@@@@@@@@@@@@@@@@@@@@@@@@@@@@@@@@@@ @ WARNING: REMOTE HOST IDENTIFICATION HAS CHANGED! @ @@@@@@@@@@@@@@@@@@@@@@@@@@@@@@@@@@@@@@@@@@@@@@@@@@@@@@@@@@@ IT IS POSSIBLE THAT SOMEONE IS DOING SOMETHING NASTY! Someone could be eavesdropping on you right now (man-in-the-middle attack)! It is also possible that a host key has just been changed. The fingerprint for the ED25519 key sent by the remote host is SHA256:+qKNn9Q4gKyDrpbuuSLcswSu3mQYYMolKqfxuYPi8Dc. Please contact your system administrator. Add correct host key in /Users/admin/.ssh/known_hosts to get rid of this message. Offending ED25519 key in /Users/admin/.ssh/known_hosts:4 Host key for 192.168.3.100 has changed and you have requested strict checking. Host key verification failed.二、解决方法sudo ssh -o "StrictHostKeyChecking=no" superpc@192.168.3.100
-
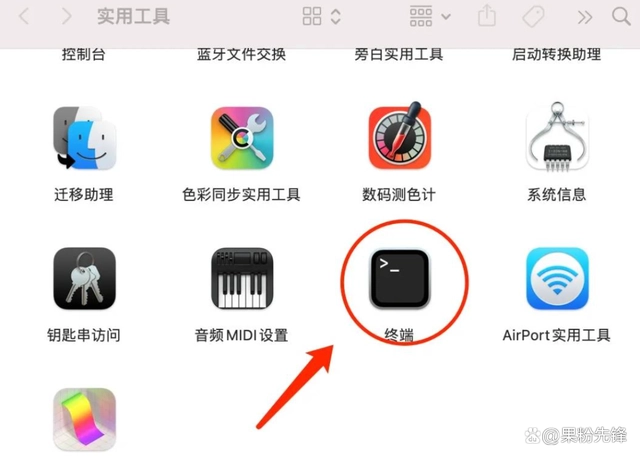
macos移除下载镜像quarantine属性 一、什么是Quarantine属性? Quarantine属性通常用于描述计算机系统或网络安全领域中的安全特性,其指的是对于具有潜在威胁的文件、程序或数据进行隔离和限制访问的一种机制。当一个文件或程序被识别为可能包含恶意代码、病毒、蠕虫等安全威胁时,系统可以将其放置在隔离区域中,以防止其进一步感染系统或网络。这个隔离区域就被称为"quarantine",隔离期间,该文件或程序不允许执行或访问系统资源,直到被确定为安全或永久删除。Quarantine属性可以在许多安全软件或操作系统中找到,例如防病毒软件、防火墙、操作系统的安全设置等。通过使用Quarantine属性,用户可以更好地保护他们的计算机和网络不受安全威胁的侵害。 苹果系统有一个GateKeeper保护机制(自 OSX 10.5 加入)。从互联网上下载来的文件,会被自动打上com.apple.quarantine标志,翻译过来就是免疫隔离,系统根据这个附加属性对这个文件作出限制。在安装软件的时候需要移除quarantine属性,二、解除Quarantine属性打开实用工具里的【终端】并输入下面的命令:sudo xattr -r -d com.apple.quarantine然后把下载的镜像文件拖拽到终端里就会出现文件路径如下admin@supermac ~ % sudo xattr -r -d com.apple.quarantine /Users/admin/Downloads/Adobe_Photoshop_2021_22.4.2.242_ACR13.3_SP_20210617.dmg回车即可解除该属性


您的IP: